Garbage Disposal Splash Guard Replacement: Check Fit First
Two guards can look identical in a photo and fit different disposers. Confirm the model, check whether the old guard lifts out at all, and treat universal as a seller's scope claim.
 Lena Schmidt
Disclosure: We may earn a commission if you purchase through links on this page, at no additional cost to you.
If your garbage disposal’s rubber splash guard is cracked, loose, or no longer sits flat, identify the disposer model and how the guard is retained before ordering a replacement. The part is not universal: some guards lift out from above, some are built into the mounting assembly, and some model lines use a proprietary baffle. A diameter that looks close can still be the wrong part. The most reliable check is the disposer’s model number and the manufacturer’s parts list; measure the old guard only when that cross-reference is unavailable.
That distinction matters because “splash guard” can refer to different pieces near the drain. A removable rubber baffle at the sink opening is a quick replacement on some units. On another model, the baffle is integrated below the flange, so pulling at it from above can damage the guard or mount. The steps below help you identify which situation you have, check fit, and decide whether this is a simple swap or a job to hand to a plumber.
First confirm that the splash guard is the failed part
The splash guard, also called a baffle, is the flexible rubber piece across the disposal opening. Its flaps help limit food and water from splashing back into the sink. It is different from the sink flange, the mounting gasket, and the discharge seal under the sink. Replacing the baffle will not fix a leak at the flange or a slow drain caused by a clog.
Look for a split, a flap that has torn away, a guard that has become misshapen, or one that no longer stays seated. A sour smell by itself is not proof that the rubber needs replacing; residue may be removable with cleaning. If the guard is intact, clean it according to the disposer manual before buying a part. Replace it when the rubber is damaged, permanently deformed, or loose after correct installation.
If water appears in the cabinet, identify where it starts before ordering anything. A leak beneath the sink may come from a loose drain connection, a worn mounting gasket, or the sink flange. Those are separate parts and often require access from below. Do not treat every wet disposer as a splash-guard problem.
Find the model number before measuring
Check the label on the disposer body under the sink. If it is hidden by plumbing, use a flashlight and a phone camera rather than loosening connections. Record the brand, full model number, and any suffix. Then look up the manufacturer’s parts diagram or support page and search for “baffle,” “splash guard,” or “sink baffle.” Save the exact replacement part number and any model list shown on that page.
This step avoids a common trap: two guards can look nearly identical in a product photo while having different outside diameters, retaining edges, or mount designs. An exact part number is stronger evidence than a marketplace claim such as “universal.” If the manufacturer lists a part as compatible with your model, use that cross-reference instead of assuming a part fits because the brand name matches.
If the model label is unreadable, look for an installation manual, receipt, warranty registration, or previous service record. The disposer may also have a model number on the underside. A photo of the full label and the drain opening can help manufacturer support identify it. Do not infer the model from horsepower or from the shape of the sink opening alone.
Decide whether your guard is removable or integrated
Before pulling, inspect the guard from above and check the model’s manual. Moen describes both removable guards and guards integrated into the mounting hardware: the removable style can be gripped at the top, while the integrated type stays in place. Waste King also distinguishes its EZ Mount disposals, which have removable guards, from its Pro 3-Bolt Mount products, which have built-in guards. These are model-family clues, not a replacement for checking the exact unit. [1][2]
InSinkErator’s Evolution Series Quiet Collar is another special case. The company lists it as a replacement sink baffle for Evolution disposers and explicitly says it is not for Badger models. Do not substitute a generic-looking ring just because the opening seems similar; the collar is part of a different sound and mounting design. [3]
If the old guard does not lift with gentle pressure, stop. Do not lever a screwdriver under the rubber or cut it out to “see what is underneath.” Resistance can mean that the part is integrated, secured by a retaining structure, or installed in a way that differs from the removable guards shown in generic videos. A user on a plumbing forum described precisely this uncertainty with a Waste King 9980: guards that lifted on other models did not tell them whether theirs would come out.
Measure only when the model cross-reference is missing
Remove the existing guard only if the manufacturer says it is removable. Lay it flat and measure the outside diameter across the retaining rim, not the widest soft flap when it is stretched. Also note the guard’s thickness, lip or groove profile, number and shape of flaps, and whether a stopper or collar is part of the same assembly. Photograph the part beside a ruler; that record is useful when checking a listing or asking a supplier a question.
If the old guard is missing, do not measure the sink’s visible drain hole and treat that as the guard’s outside diameter. The rubber edge normally has to engage a specific seat or mount. Measure the disposer opening only as a secondary check, and compare that measurement with the manufacturer’s diagram or a confirmed compatible part. Ask the supplier for a dimensioned drawing of the actual replacement, including the outer rim and retaining profile.
Published sizes can be helpful, but they do not create a universal brand chart. Waste King’s FAQ says its EZ Mount drain is approximately 3-1/8 inches wide and its Pro 3-Bolt Mount drain is roughly 3-3/8 inches wide; it also says the two styles differ in guard removability. That information describes Waste King’s mounting families. It does not prove that every 3-1/8- or 3-3/8-inch guard fits every disposer with a similar opening. [2]
When the product listing gives one diameter but no retaining shape, material, or compatibility list, treat fit as unconfirmed. Ask for a drawing and a model cross-reference before buying. A measurement can narrow the search; it cannot replace the retention detail.
Choose a replacement using a fit hierarchy
Use this order when comparing replacement options:
Exact OEM part number: choose the manufacturer’s part listed for your disposer model.
Manufacturer-confirmed equivalent: use a third-party part only when its compatibility list names your exact model or part number.
Dimension-matched generic: consider it only when the retaining profile and diameter match the removed part, and you can return it if it does not seat correctly.
Unclear “universal” listing: skip it if the listing gives no usable dimensions or model coverage.
“Universal” is a seller’s scope claim, not a dimensional standard. Even where replacement guards share a similar outside diameter, they may differ in fit at the rim, stiffness, flap openings, sound-damping structure, or installation method. If the guard is too small, it may not stay in place; if too large, it can buckle instead of sitting flat. Either condition can interfere with normal use.
Avoid trimming flaps to make a mismatched guard drain faster. If a new guard appears to slow water flow, first confirm that it is the right model, oriented correctly, fully seated, and not covering the opening incorrectly. A slow sink can also have a drain restriction unrelated to the guard. The remedy is to diagnose the cause, not alter the baffle without manufacturer guidance.
Replace only the style your manual says can be removed
For a confirmed top-removable guard, start by disconnecting power. Unplug a corded disposer or turn off the correct breaker for a hardwired unit; the wall switch alone is not an adequate safeguard while working at the opening. Keep your hands out of the grinding chamber. Moen’s safety instructions say to disconnect power and never place a hand inside the disposal. [1]
With power off, use the removal method in your model’s instructions. Some guards lift out by hand; others have a specific orientation or collar. Clean the accessible seat, then install the new part in the stated direction. Moen, for example, says its removable guard goes in with the cup-shaped side first and should be pressed around the outer edge until snug. That direction is model-specific, so do not assume it applies to another brand. [1]
If your guard is integrated or the manual requires removal of the disposer, this is not the quick top-side replacement shown in short videos. The unit may need to be supported while plumbing and mounting connections are released. Do not disconnect it unless you understand the installation and can safely support the weight. If the instructions are unclear, the mount is corroded, or you see a leak, use an appliance technician or licensed plumber.
A sourcing option for the 80 mm Waste King style
If your model documentation confirms an 80 mm (about 3.15 inch) removable Waste King-style guard, this Alibaba listing for an 80 mm replacement splash guard is one sourcing lead to compare. Its current listing identifies the part as a rubber replacement for Waste King, gives an 80 mm / 3.15 inch size, and shows a minimum order of two pieces. Those are supplier-listing claims, not a manufacturer compatibility approval. Confirm the exact model, rim profile, material, shipping terms, and return terms before ordering. The listing’s price and stock can change.
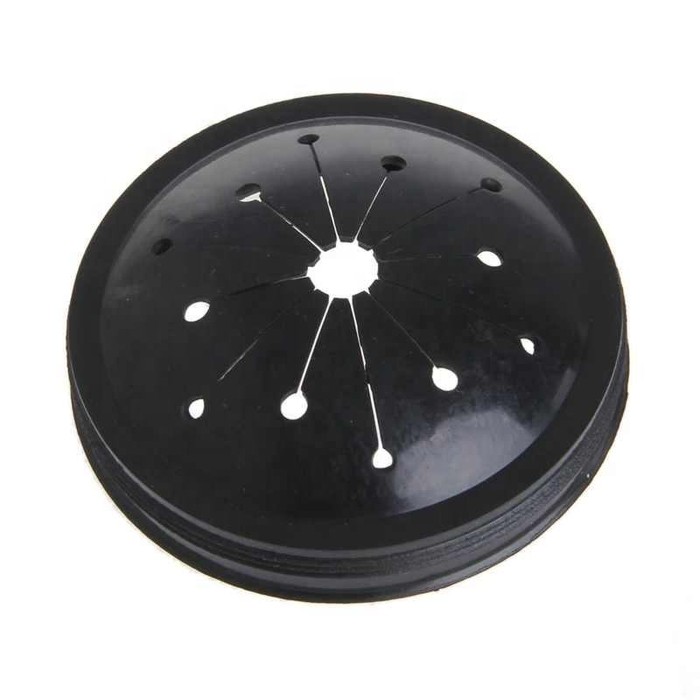
Rubber replacement splash guard for Waste King 80 mm (3.15 in)
A rubber replacement guard listed for Waste King disposers with an 80 mm (3.15 in) opening. The listing states that size and style; it does not establish that your model uses the same retaining profile, so cross-check the disposer model number and the removed part before ordering.
- Role: Fit-trial candidate
- 80 mm / 3.15 in claim
- Waste King style
- Confirm model match
- MOQ: Check current listing
Check the fit before restoring power
With the replacement installed, look around the full rim. It should sit evenly, without a rolled edge, visible gap, or section that pops up when lightly pressed. Confirm that the center opening and flaps are oriented as the instructions show. Do not use adhesive, silicone, or glue to hold the guard in place unless the manufacturer specifically requires it; an improvised bond can complicate future cleaning or removal.
Remove tools and loose debris from the sink. Restore power only after the opening is clear, then test the disposer according to its manual. Watch for unusual movement, a guard that lifts, splashback, or a leak below the sink. Turn the power off again if the guard shifts, rubs, or appears to block the opening. Recheck the part number and seating rather than pushing harder.
If water drains more slowly only after installing the new part, compare the old and new guard side by side. Check whether the replacement is too stiff, has a different flap layout, or is the wrong part for your unit. Also run water with the disposer off to see whether the sink itself drains slowly. If the problem remains after fitting the correct guard, investigate the drain line separately.
What the search results and repair videos leave out
Current search results include short removal videos, plumbing how-to pages, parts retailers, manufacturer support, and forum questions. The videos are useful for seeing hand motion on the particular disposer shown, but their titles rarely establish that your model uses the same mounting style. A popular replacement video, for example, shows one guard being pulled from above; Moen’s own guidance confirms that some guards are integrated and stay in place. [1][4]
The recurring question in forums is not simply “how do I pull it out?” It is “does this particular model’s guard pull out at all?” That is why checking the model and part number should come before copying a video. User reports are useful evidence of where owners get stuck, but one person’s experience does not prove compatibility across a brand or model family.
The short answer
Buy a garbage disposal splash guard by disposer model and retention style, then use measurements as a cross-check. Confirm that the old guard is designed to come out, find the exact part number where possible, and compare both its diameter and retaining profile. Treat “universal” as unproven until the seller names your model or provides a dimensioned drawing. If the guard is built into the mount, do not pry from above. A few minutes spent identifying the part can prevent a failed fit and a repair that becomes larger than the original problem.
Sources
-
Moen Solutions, “How to Unjam a Garbage Disposal” (power isolation, removable vs. integrated guard, orientation) Source
-
Waste King, FAQ “What is the difference between an EZ Mount and Pro 3-Bolt Mount disposal?” (removability and mount-family drain widths) Source
-
InSinkErator, Quiet Collar Sink Baffle, Evolution Series (SKU 74653D; not for Badger) Source
-
YouTube, “Replace Garbage Disposal Gasket Splash Guard” Source
Hook this up to your favourite commenting platform — Giscus, Disqus, or your own.
Continue reading
Dog Poop Bag Refills: Check Roll Fit Before You Buy
Bag width and length do not tell you whether a refill fits the dispenser. Compare roll diameter, usable width and the core before you buy a multipack.

Toilet Brush Refills: Check the Connection Before You Buy
A refill that will not fit is usually the wrong coupling, not a badly made brush. Identify the handle, compare the connector, and dry-fit before you trust the word universal.
How to Match Dishwasher Lower Rack Wheels Before You Buy
Match the part to the model number, not to a photo. Confirm which wheel failed, read the full model number, and check whether the listing is one wheel or a whole assembly.