How to Choose Dishwasher Rack Tine Caps for a Rusty Rack
Tine caps only work when the rust is limited to a few exposed tips and the wire is still firm. Check the opening, length and shape of the tine before ordering a pack.
 Lena Schmidt

Disclosure: We may earn a commission if you purchase through links on this page, at no additional cost to you.
A quick answer
Choose dishwasher rack tine caps only when rust or missing coating is limited to a few exposed tips and the wire underneath remains firm. Before ordering, compare the cap’s opening and length with a clean, undamaged tine on your rack, check whether the tines are straight or angled, and count how many tips need covering. A pack described as “universal” is not a fit guarantee. A 2022 video demonstration from Abbotts At Home shows a DIY rack repair using sanding, coating, and tine caps; it is useful for seeing the process, but its own description says the creator is not a professional [6]. If the wire bends, flakes apart, has rust through its middle, or the rack frame is distorted, caps cannot restore its strength; look up the correct replacement rack by the dishwasher’s full model number.
Caps are small sleeves that cover the end of a dishwasher rack tine. They can reduce direct contact between an exposed rusty end and dishes, and can protect a sound tine after loose rust is removed. They do not rebuild missing metal, secure a loose tine, or repair every damaged patch on the rack. That boundary matters more than color or pack size.
Why rack tines rust
Most dishwasher racks have a metal core covered by a protective plastic or vinyl layer. Scraping, impacts, or repeated rubbing can chip that layer; once bare metal is exposed, moisture and detergent can contribute to corrosion. Maytag lists sharp utensils, forced loading of heavy or oversized cookware, and impact from dropped items among causes of coating damage [1]. Rust on the rack may then leave brown marks on dishes. A food stain or mineral film can also look brown or white, so inspect the rack itself before treating a mark as rust.
The common repair question begins with a visible orange point on an upright prong. Check the full tine, including the lower end where it meets the rack wires. A cap may hide a small exposed end; it cannot restore a tine that has snapped, has a deep pit, or moves more than its neighbors.
Decide whether caps are the right repair
A cap is a reasonable first option when the affected wire is straight, rigid, and still attached securely. The damage should be local enough that the cap can sit over a stable tip. You can test the tine gently with a finger; do not bend it back and forth to “see if it holds,” because that can worsen a weakened wire. Compare it with an undamaged tine on the same rack.
Choose a rack repair kit with touch-up coating when the damage is a scratch, chip, or exposed patch along the wire that a cap cannot cover. Manufacturer repair kits combine tine tips with vinyl paint or coating for broader touch-ups. Sears PartsDirect’s repair instructions describe removing loose rust, cleaning and drying the rack, applying vinyl touch-up paint to damaged areas, and placing a plastic cover over rusted tine tips [2]. Follow the product instructions for preparation and curing; the exact coating and dry time can differ.
Replace the rack when rust is widespread, the wire is soft or perforated, several tines are loose, or the frame is bent or cracked. Bosch’s support advice recommends a replacement rack when rust is likely to keep transferring onto dishes [4]. A model-specific replacement rack costs more than a small cap pack, but a cap is not a substitute for structural repair. If only one or two tines are damaged, checking the replacement part price can still help you decide whether a repair kit is worth it.
Check fit before buying
Do not start with the word “universal.” Start with your rack. Remove the rack so you can see the tine shape and inspect the ends in good light. If your dishwasher manual or manufacturer’s parts lookup lists a rack repair kit for the model, use that compatibility information first. Record the full model number from the appliance label; brand name alone is not enough to confirm a replacement rack or OEM kit.
For third-party caps, compare three things in the listing and, where possible, measure your rack:
-
Inner opening: the cap must grip the tine without stretching so far that it splits or slipping loosely.
-
Length: it needs enough coverage to surround the exposed area, but should not make adjacent dishes sit at an awkward angle.
-
Shape: many low-cost packs are made for straight round wire ends. Angled, flattened, unusually thick, or broken tines may not accept them cleanly.
Measure an undamaged tine, not the rusty or swollen section. Treat “fits most” as uncertain unless the listing provides dimensions or compatibility details, and check the return terms before buying a large pack.
Color is mainly a visual choice. White caps can blend with light racks; gray may disappear better on a darker rack. Neither color tells you whether a cap is dishwasher-safe or the right size. Check the stated material and intended appliance use, and avoid improvising with cable caps, furniture tips, or soft craft tubing that is not sold for dishwasher racks.
Estimate how many caps you need
Count exposed or actively rusting tips, not the number of tines on the whole rack. If you intend to cap every tine as preventive coverage, count the full row or rack first and decide whether the extra material makes sense. Pack counts vary: the product page for the Cenipar cap example lists 100 pieces and a one-inch round tip [7], while Whirlpool’s 4396838RC repair kit is described by the manufacturer as including tine tips plus a four-ounce bottle of touch-up paint [3]. Those are product-specific details, not a standard size or quantity for all kits; confirm the current listing before ordering.
Mark each damaged tine with removable tape as you inspect it, then count the marked ends. Do not assume a pack covers two racks unless the seller says so and you have checked how many tips need repair.
Caps versus coating and a full kit
Tine caps and brush-on coating solve overlapping but different problems. A cap covers the tip of a tine and stays in place by a snug fit. Touch-up coating is better suited to a scratch or exposed patch on a broader section of wire. A combined repair kit can be useful if several tips need caps and neighboring coating is also chipped. Whirlpool describes its 4396838RC kit as including tine tips, an applicator brush, and a four-ounce bottle of touch-up paint for several white dishwasher brands and models. That is not proof it fits every rack color or shape.
User reports help identify practical friction points, but they are not controlled durability tests. In an Epicurious first-person account, the writer says warming tight caps in her hands or soaking them in hot water made them easier to install [5]. A Reddit user likewise mentions hot water after finding caps difficult to push on. These are anecdotes, not manufacturer directions. Check the cap label; do not use boiling water, a flame, or a heat gun. If a cap resists, it may be the wrong size or shape.
Prepare the rack safely
Take the rack out and work away from the dishwasher tub. This keeps rust dust and loose coating out of the filter and spray system. Put the rack on a stable surface with a cloth or paper underneath. Wear eye protection for sanding and gloves around sharp edges. For a cap-only repair, remove loose rust with fine abrasive or a hand brush, then wipe away dust. Do not grind the tine thinner or sand a structurally weak wire.
If you are applying a coating, follow its own instructions for rust removal, cleaning, ventilation, and cure time. Sears PartsDirect advises sanding or filing rust, cleaning and drying the rack, applying vinyl paint, and allowing at least eight hours of drying before reinstalling in the instructions for the kit it describes. It also recommends running an empty detergent cycle afterward to rinse away paint residue. Treat that as guidance for that repair process, not a universal cure time for every coating. The label on the product in your hands and the dishwasher manual take priority.
Install caps without damaging the rack
Test one cap on one prepared tine before opening or fitting the rest. Align the opening straight with the wire and push it on with steady pressure. A gentle twisting motion can help a tight sleeve travel over a smooth tip, but stop if the cap splits, folds, or refuses to cover the damaged area. Do not force a cap over a sharp burr; smooth the loose edge first. Do not use a knife to widen the opening while the cap is on the tine.
Cover the exposed tip without letting the cap interfere with rack movement. Check neighboring tines from the side to confirm dishes still sit securely and clear the spray arm and tub wall.
If a kit includes adhesive or vinyl paint, use it only as its label directs. Sears’ repair instructions apply a small amount of touch-up paint at rusted tips before sliding on the plastic cover and wiping off excess. Do not add household glue or sealant unless the kit maker specifies it. Adhesives not intended for repeated hot, wet, detergent exposure can fail or leave residue.
Inspect the repair after installation
Before loading dishes, run a fingertip carefully over the cap’s outside to check for sharp edges, exposed wire, or a sleeve that moves freely. Avoid pressing on a sharp tine. Slide the rack in and out once and make sure it clears the tub and door. Place one ordinary plate or bowl in the nearby slot and check that it stands as it did before. If the cap shifts, comes off, or interferes with loading, remove it and reassess fit rather than adding another layer over it.
On the first wash, follow the cap or coating manufacturer’s directions. If a kit requires an empty cycle after paint application, do that before loading dishes. Sears gives an eight-hour minimum dry time and an empty detergent cycle for the kit procedure described on its page [2]. After the cycle, check for movement, flaking, or new rust; inspect again after a few washes. If rust spreads or the wire changes shape, compare a model-matched rack.
Why caps can fall off or fail
The usual causes are a mismatch, a rough or swollen tine, or corrosion that has weakened the wire. Community posts describe caps as tight to install, while one recent thread about broken tines shows the boundary clearly: once rods are breaking away, a cap is not a structural fix. These discussions are useful for understanding the real questions people ask—“will it fit?” and “is this too far gone?”—but manufacturer compatibility information should guide the purchase.
A cap can also look seated while covering only the very end of a longer rusty patch. Inspect the full tine before ordering and choose coating for exposed areas that extend beyond the cap. If the rack’s original plastic layer is lifting around many wires, a few sleeves may only hide the most visible points while the underlying damage continues. Avoid treating recurring orange residue on dishes as proof the cap itself caused it: check the whole rack and the load for other rusting metal items as well.
A practical buying checklist
Before adding a dishwasher rack tine cap kit to your cart, confirm these points:
-
The rust is localized, and the wire remains rigid and firmly attached.
-
The tine is straight enough for the cap style shown in the listing.
-
The listed opening or fit notes match your rack, or the seller provides a clear return option.
-
You know how many tips need repair and whether paint is also needed.
-
The cap material and coating are labeled for dishwasher rack repair.
-
You have checked the full model number if buying an OEM kit or replacement rack.
For a small number of stable, rusty ends, caps can be a compact repair. For chips along the wire, choose a compatible coating or kit. For a weakened or broadly corroded rack, price the model-specific replacement instead of trying to solve a metal problem with more plastic. The right choice comes from the condition of the rack and a verified fit—not from the biggest pack or a broad “universal” claim.
Product example
One listing to compare is the Cenipar Dishwasher Rack Tine Prong Repair End Cover Caps on Amazon, 100 count, described with one-inch round tips [7]. Use it as a sizing reference, not an endorsement: compare the listing’s current specifications with your own rack and check whether the caps are returnable if the fit is wrong. If you need both tip covers and coating for chips, compare a manufacturer repair kit such as Whirlpool 4396838RC, then verify model and color compatibility with the official parts information before purchase.
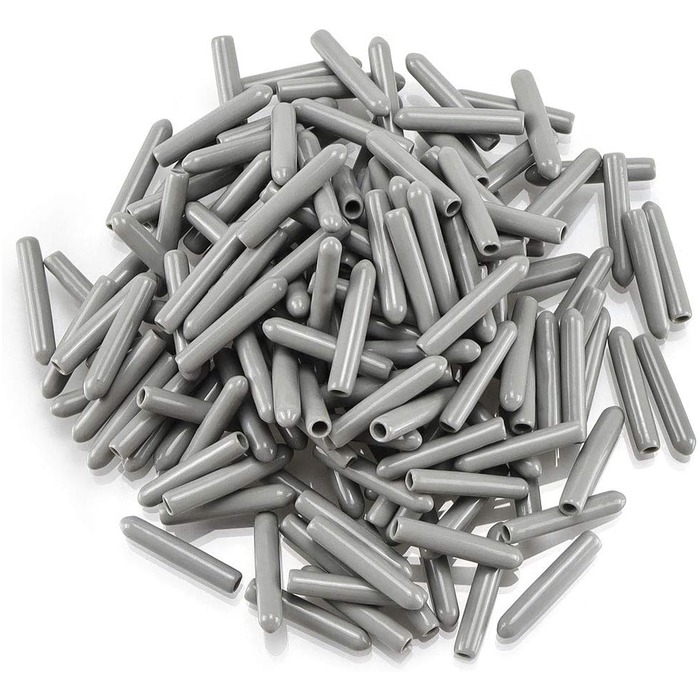
Cenipar dishwasher rack tine caps, 100 count
Small sleeves for a straight, rigid tine with a localized rusty tip. They cover the exposed end but do not rebuild missing metal or secure a loose tine, so check the wire before ordering.
- Role: Amazon consumer option
- 100 pieces
- 1-inch round tips
- For straight tines only
- MOQ: Check current listing
Sources
-
Maytag Product Help Tines are Chips, Scratches or Damaged — Dishwasher Source
-
Sears PartsDirect How to fix rust spots on a dishwasher dishrack video Source
-
Whirlpool Dishwasher Rack Repair Kit 4396838RC Source
-
Bosch Home Appliances Dishwasher is damaged Source
-
Epicurious How to Fix a Rusty Dishwasher Rack for Less Than $10, Aug. 15, 2022 Source
-
Abbotts At Home, YouTube Quick & Easy Fix for Rusty Dishwasher Racks — Using ReRack Repair Coating!, July 11, 2022 Source
-
Amazon product listing Cenipar Dishwasher Rack Tine Prong Repair End Cover Caps
Hook this up to your favourite commenting platform — Giscus, Disqus, or your own.
Continue reading
How to Choose a Zipper Repair Kit That Fits Your Zipper
A number on the slider is only part of the match. Identify the chain type, confirm the size, then check direction, slider function and end parts before buying a kit.
How to Choose a Stove Gap Cover for Uneven Counters
Measure the seam at the front, middle and back on both sides, then match the profile. A strip bridges a gap; it does not level a range that sits too high.

How to Choose a Bathtub Hair Catcher for a Pop Up Stopper
A catcher that works with a raised pop-up stopper sits over the drain, not inside it. Identify the mechanism, then measure the flat area and cap height before ordering.