How to Choose a Zipper Repair Kit That Fits Your Zipper
A number on the slider is only part of the match. Identify the chain type, confirm the size, then check direction, slider function and end parts before buying a kit.
 Lena Schmidt
Disclosure: We may earn a commission if you purchase through links on this page, at no additional cost to you.
Start with the zipper, not the kit
A zipper repair kit is useful only when its sliders match the zipper chain already sewn into the bag, jacket, tent, or luggage. A number such as #5 is only part of the match. The replacement must also suit the chain construction—coil, molded plastic, or metal—and sometimes the zipper direction, slider function, and brand-specific profile. A kit can contain dozens of pieces and still have no compatible slider for your item.
Before ordering, inspect the zipper while it is closed. Look for missing teeth, a torn tape, a damaged bottom box or pin, and a slider that has spread apart or lost its pull. If the chain is intact and the old slider is the likely failure, a slider replacement may be practical. If teeth are missing or the fabric tape is ripped, replacing only the slider usually cannot restore the chain. That item may need a new zipper or a professional repair.
The reliable sequence is: identify the chain type, read any markings, measure the closed teeth if needed, then check special features and the kit contents. Do not buy by the item name alone. “Universal” describes a seller’s range of included parts, not a promise that every zipper uses the same geometry.
Decide whether the slider is really the problem
A slider can fail in a few recognizable ways. The pull tab may break while the body still moves. The zipper may open behind the slider because the slider no longer presses the two sides together. Or the slider may jam at one point even though the teeth look intact. A replacement body may solve those problems when the chain itself remains sound.
Run the old slider slowly across the full length and watch the chain behind it. If the two sides separate immediately, check the teeth for damage and examine whether the slider is loose, bent, or cracked. A missing tooth leaves a visible gap in the chain; a frayed tape can let otherwise good teeth pull away from the fabric. A new slider cannot replace either missing teeth or torn tape. Rugged Thread’s repair guide similarly distinguishes slider trouble from damaged teeth and directs readers toward full zipper replacement when teeth are missing [1].
Also check the zipper’s end. A closed-end bag zipper has top stops that prevent the slider from coming off. A separating jacket zipper has a box and pin at the bottom so the two sides can be joined before zipping. These parts are not interchangeable. If the box, pin, or lower stop is the failed component, a kit containing only sliders is not the right repair.
This check avoids the common false start: ordering a mixed kit for a zipper whose chain has already failed. Take a close photo of both sides of the teeth, the zipper end, and the back of the slider before you shop. Those details are more useful than the garment’s label or the bag’s advertised size.
Tell coil, molded plastic, and metal apart
The three common chain constructions look different when you inspect the closed zipper. A coil zipper has a continuous spiral of nylon or polyester along the tape. Molded plastic zippers have separate, regularly spaced teeth molded onto the tape; YKK calls one of its well-known molded-tooth lines VISLON. Metal zippers use individual metal teeth. Sailrite’s replacement guide emphasizes that a slider must match both the size and the chain type; a #5 slider for molded teeth is not automatically right for a #5 metal zipper [2].
The distinction is easy to miss in a product photo. A coated or reverse-coil zipper may show a smooth side on the outside, while the coil is hidden on the back. Turn the zipper over and inspect the chain itself. If it is a waterproof or reverse-coil design, look for a replacement specified for that configuration rather than assuming a standard forward-coil slider will behave the same.
Reddit sewing and MYOG discussions show this confusion in practical terms: people compare parts marked with the same number, then discover one is intended for coil while the zipper has molded teeth. Those posts are anecdotes, not compatibility charts, but they illustrate why a number match alone can lead to a wrong order. Treat the seller’s product diagram and the zipper maker’s compatibility information as stronger evidence.
If the original slider is still present, photograph its back and front. Some brands stamp a number or code on the slider. If you cannot identify the construction confidently, take the item to a repair shop or contact the kit seller with clear photographs before cutting off the original part.
Measure the size and use markings carefully
Zipper numbers are nominal size labels tied to the chain’s width; they are not a universal measurement of the entire slider. WAWAK explains that the size roughly corresponds to the width of the closed zipper teeth in millimeters, and that you can measure across the teeth when the slider marking is missing [3]. Measure the chain, not the cloth tape or the slider body. Keep the zipper closed so the teeth or coil sit in their normal joined position.
Start with the back of the old slider. Look for a number, often with a letter or brand mark. Use a bright light or phone camera zoom; small stamps are easy to overlook. The number can be a useful clue, but the letter codes do not all mean the same thing across manufacturers. Sailrite notes that some letters indicate chain type while others may identify a maker’s style or production detail [2]. Confirm the interpretation against the zipper or slider manufacturer where possible.
If there is no readable marking, measure the closed chain across its widest tooth area with a ruler or caliper. Write down the measurement in millimeters and compare it with the kit’s stated sizes. WAWAK’s sizing explanation uses the nearest standard size, while Sailrite cautions that actual zipper widths can vary and may not land exactly on a nominal number [2][3]. In other words, a reading near a boundary is a reason to check a brand chart or ask for help, not to round confidently and hope.
Measure a few undamaged points, particularly if the zipper is worn or distorted near the failure. Do not use one crushed section as your only reference. Keep a note with the chain type and measured width—for example, “nylon coil, closed chain about 5 mm”—rather than recording only “size 5.” That short description makes a seller’s compatibility answer much more useful.
Check the features a mixed kit may not cover
After chain type and size, check the slider’s job. A locking slider holds its position until the pull tab is lifted or moved; a non-locking slider can travel more freely. A bag that should stay closed under movement may need the same locking action as its original slider. A two-way zipper may require a double-pull slider, while a standard one-pull replacement will change how the item opens. Sailrite describes locking and non-locking options as a separate choice after matching size and chain type [2].
Look at zipper direction and the end construction too. Reverse-coil and waterproof zippers can have the coil on a different side or use a coated chain. Separating jackets have an insertion pin and box at the bottom; luggage, sleeping bags, and some tents can use two sliders on one chain. Some garment zippers also have proprietary or less common sizes, including #4.5 variants. A general kit may omit these even when its listing names several common gauges.
This is why “fits #3, #5, #8 and #10” should be read as a list of nominal sizes included, not as full compatibility proof. Check whether the listing separates coil sliders from molded-tooth and metal sliders, shows the underside of each slider, and says which configurations are excluded. If those details are absent, ask the seller for a compatibility chart before ordering.
YKK’s own product catalog includes a replacement slider designed for repair, which is a reminder that some zippers have manufacturer-specific replacement paths [4]. When the original slider has a YKK code or the zipper is a specialty style, check the maker’s parts route first. A broad kit is most useful for common chain types; it is a poor substitute for an exact proprietary part.
Read the kit listing as a parts specification
Count the useful pieces, not just the total. A listing may say “200 pieces” because it combines sliders, pull tabs, stops, pliers, and storage pieces. For your repair, the important line is whether it includes the exact slider family you need, how many of that family are supplied, and whether the kit includes a way to restore the stop you must remove.
Use a simple match check before checkout:
| What you know | What the listing should confirm |
|---|---|
| Chain construction | Coil, molded plastic, metal, or the exact maker’s chain |
| Nominal size | The size stamped on the slider or measured across closed teeth |
| Direction | Standard, reverse coil, or waterproof configuration if relevant |
| Slider function | Locking, non-locking, single pull, or double pull |
| Zipper end | Whether stops or other end parts are needed for this repair |
| Exclusions | Jeans, proprietary, reversible, or heavy-duty chains that may not fit |
Read the limitations as carefully as the headline. The VICHERIA 200-piece kit used below lists common #3, #5, #8, and #10 sliders and YKK-compatible components. Its own listing warns that some designs—such as #4.5/#4YG jeans zippers, reversible VISLON styles, and certain heavy-duty YKK applications—may not fit. That restriction matters more than the word “universal.” The actual kit should be selected only after checking its product images and the zipper in hand.
If a seller responds only “fits most zippers,” send the chain photo, slider code, closed-tooth measurement, and whether the zipper separates at the bottom. Ask which exact part in the kit matches. A clear, item-specific answer beats a confident generic claim.
Replace the slider without sacrificing the zipper
Before starting, check the kit instructions and the item’s repairability. A common repair removes the top stop, slides off the damaged slider, feeds the replacement onto the chain in the correct direction, then installs a new stop or secures the end. The exact method varies with the zipper and garment. iFixit’s coil-slider guide illustrates removing the stop and changing the slider on a simple coil zipper [5]; it should not be treated as instructions for every jacket, tent, or luggage chain.
Protect the fabric while removing a stop. Use the tool the instructions specify and work slowly; cutting too close can nick the zipper tape. If the slider is sewn into a jacket seam or hidden under a placket, opening and restoring the stitching may be needed. For an expensive coat, technical outerwear, or a waterproof zipper, a tailor or outdoor-gear repair shop can be cheaper than damaging the item during a trial repair.
Feed the replacement onto both sides of the chain evenly. If one side enters higher than the other, the slider can jam or the chain can close unevenly. Do not force it over teeth that are bent or out of alignment. Once it moves, close and reopen the zipper several times over its full length, then inspect the chain behind it for gaps. Check that the stop holds and that the slider does not run off the end.
If it still splits open, stop and recheck the match: chain type, size, orientation, and slider function. Pliers are not a universal fix for a poor fit; squeezing a slider too far can bind it or damage the chain. If the correct part is uncertain, preserve the original slider and ask a repair professional before making more cuts.
A kit example and the final buy decision
The VICHERIA Universal Zipper Repair Kit is one candidate for people who repair several common bags, jackets, or backpacks. The Amazon listing shows 200 pieces, common #3, #5, #8, and #10 sizes, a 4.4 out of 5 rating from 3,316 ratings, a price of $24.99, and in-stock status. These are marketplace details and can change. The listing also includes exclusions, so this kit should not be treated as a fit for every zipper.
Before buying, complete this short check: the teeth are intact; chain type is identified; the nominal size is supported; direction and slider function match; and the zipper end can be safely restored after installation. If any answer is unknown, pause and confirm it from a manufacturer chart or the seller before ordering. An exact replacement slider may be a better purchase than a large assortment when you are fixing one specialized zipper.
View the VICHERIA zipper repair kit on Amazon
The kit is a parts option, not a promise that the repair will work. Use the listing images to match the component to your zipper and follow the actual item’s repair instructions.
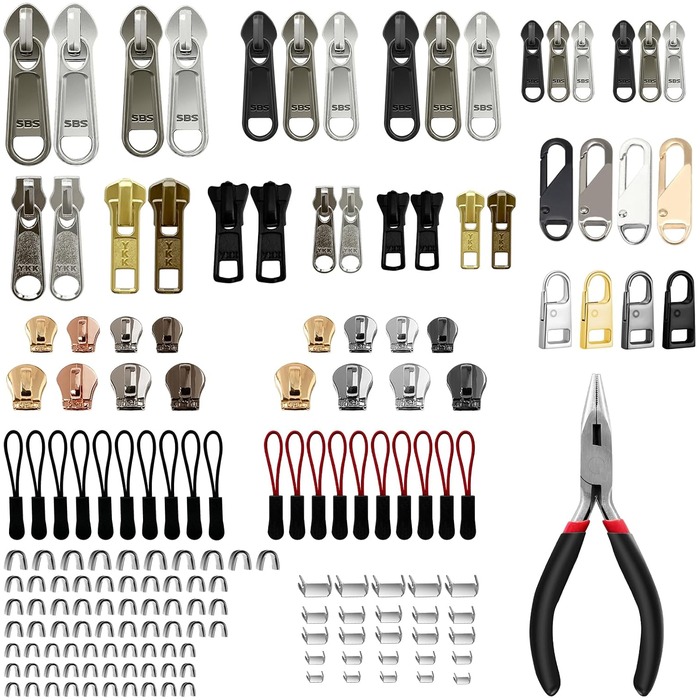
VICHERIA universal zipper repair kit, 200 pieces
A mixed assortment of #3, #5, #8 and #10 sliders with pulls and stops for common coil, molded and metal chains. The listing itself excludes jeans zippers, reversible VISLON styles and some heavy-duty YKK applications.
- Role: Amazon consumer option
- 200 pieces
- #3 #5 #8 #10
- Check chain type and size first
- MOQ: Check current listing
Sources
-
Rugged Thread Zippers 101 Identifying Issues Types and DIY Repair Solutions
-
Sailrite Choosing a Replacement Zipper Slider Source
-
WAWAK Zipper Size Chart Source
-
YKK Digital Showroom Revived Replacement Slider Source
-
iFixit Coil Zipper Slider Replacement
-
Zipper Shipper Zipper Slider Pull Tab Replacement Guide Source
-
YouTube How To Fix A Zipper Slider and Tutorial on Zipper Parts Episode 30
-
YouTube YKK Official Revived Replacement Slider
Hook this up to your favourite commenting platform — Giscus, Disqus, or your own.
Continue reading

How to Choose a Stove Gap Cover for Uneven Counters
Measure the seam at the front, middle and back on both sides, then match the profile. A strip bridges a gap; it does not level a range that sits too high.

How to Choose Dishwasher Rack Tine Caps for a Rusty Rack
Tine caps only work when the rust is limited to a few exposed tips and the wire is still firm. Check the opening, length and shape of the tine before ordering a pack.

How to Choose a Bathtub Hair Catcher for a Pop Up Stopper
A catcher that works with a raised pop-up stopper sits over the drain, not inside it. Identify the mechanism, then measure the flat area and cap height before ordering.