Why Your Refrigerator Water Filter Leaks After Replacement and What to Check
A leak right after a filter change usually starts at the cartridge connection. Reseat it, confirm the part matches the model, then separate a head leak from a dispenser drip.
 Lena Schmidt
Disclosure: We may earn a commission if you purchase through links on this page, at no additional cost to you.
If a refrigerator starts leaking right after you change its water filter, stop dispensing and find where the water is coming from before you buy another cartridge. A drip at the filter head often points to a filter that is not seated, a damaged or displaced seal, or the wrong part. Dripping at the dispenser after a new filter can instead come from air in the water path; a puddle under the refrigerator may have another source entirely. Follow the refrigerator manual for that exact model, and shut off its water supply if water is actively escaping. Do not force a filter into its housing.
Start with the location, not another filter
Dry the visible area with a towel, then watch the first place that becomes wet. A filter leak usually begins at the cartridge connection, the filter cap, or the housing where the cartridge locks. Water from the dispenser nozzle has a different route. Water spreading from underneath the refrigerator may come from a supply connection, tubing, an ice maker, or a drain system rather than the filter you just replaced. The timing matters too: a problem that begins as the new cartridge is installed deserves a fit and seal check before you diagnose a general refrigerator leak.
If the leak is steady, close the refrigerator’s water shutoff valve if you can reach it safely and know which valve serves the appliance. Keep towels or a shallow pan around the wet area, and do not pull a heavy refrigerator across wet flooring to inspect the back. If water is near an outlet, power cord, or electrical component, avoid touching the wet area or appliance plug; cut power from a dry, safe location or get qualified help. A few drops from a dispenser immediately after use may be different from water continuously escaping inside the filter compartment. Your model’s instructions define the normal behavior.
| What you see | Likely starting point | First check |
|---|---|---|
| Wetness begins at the filter connection | Cartridge seating, O-ring, wrong part, or filter head | Turn off supply if active; check the exact lock and seal steps. |
| Drips only from the dispenser after the change | Air in the water path or another dispenser issue | Use the manual’s exact flush and observe whether dripping stops. |
| Water appears beneath the refrigerator | Supply line, ice maker, drainage, or another leak source | Dry the area and use model-specific leak guidance; stop if water is heavy. |
Reseat the cartridge without forcing it
A cartridge can feel installed while its tabs or threads are still short of the locked position. On a twist-in design, remove it using the manual’s release direction, line up the marks, and turn it until the specified stop or lock indicator is reached. On a push-in design, check the alignment and the model-specific locking cue; do not assume every push-in filter uses the same button or insertion depth. Whirlpool and Samsung both tell owners to check that a filter is seated or locked, but their instructions are specific to their product families.[1][2]
Before reinstalling, follow the manual’s instructions for shutting off or relieving water pressure. Remove the cartridge straight, without twisting against a locked stop or levering the housing. Look at the filter head and its seal: check that an O-ring is present, seated in its groove, and free of visible cuts, flattening, twisting, grit, or residue. Inspect the cartridge body and connection for cracks or damage. If an O-ring is missing or damaged, replace the cartridge or the specified service part. Do not stack an extra O-ring, stretch the existing one, or add plumbing grease unless the refrigerator or filter maker explicitly directs it.
Clean only the sealing surface as the appliance maker allows, using a soft damp cloth when directed. A grain of debris or mineral buildup can prevent a seal from sitting flat. Reinstall the cartridge in line with the housing; stop if it binds, cross-threads, needs a tool, or will not reach the lock indicator with normal hand pressure. Overtightening can distort a seal or stress a plastic housing. If the cartridge will not lock after one careful, model-correct attempt, stop and verify its part number rather than forcing it.
Confirm that the replacement actually matches the refrigerator
“Fits GE,” “fits Whirlpool,” or a long compatibility list is not enough on its own. Find the complete refrigerator model number on the appliance label and the part number printed on the old cartridge or listed in the owner’s manual. Compare both with the new filter’s exact model code and compatibility list. Check suffixes, cartridge shape, connection style, and any stated revision. Two filters can look similar and still have different locking geometry or seal placement. The refrigerator manufacturer may recommend an original filter; an aftermarket filter is a candidate only when its exact model compatibility and claims can be checked.
Certification is a separate question from fit. A certification mark does not prove a cartridge fits your refrigerator, and a compatible-fit claim does not establish which substances the filter is certified to reduce. Check the certification directory for the precise filter model and standard, then compare the claim with your water-treatment need. For example, NSF listings distinguish specific claims such as chlorine, taste, and odor reduction from other performance claims. Do not assume a plain model and a “Plus” or “Pro” suffix share the same certification just because they fit the same connection.[3]
If the old cartridge was leaking-free and the new one will not seat, compare their connector ends and seal positions side by side. Do not shave plastic, transfer loose seals, or modify either cartridge. Keep the packaging and order record until the new filter has passed the leak check. If the seller’s listing combines several pack sizes or variants, confirm the selected model and quantity before ordering; the page title and the option selected at checkout can differ.
Separate a filter-head leak from a dispenser drip
A new filter can introduce air into a refrigerator’s water path. Some manufacturers ask users to dispense a specified amount of water after replacement to flush the cartridge and clear trapped air. Whirlpool notes that an unflushed filter can be associated with dispenser dripping, cloudy water, or hollow ice; Samsung’s instructions give a model-specific flush step as well.[1][2][4] These details do not mean every dispenser drip is harmless or that the same flush volume applies to every refrigerator. Use the exact procedure and quantity stated in the appliance and filter instructions.
If the wetness is at the nozzle and occurs only just after dispensing, complete the specified purge, then observe whether the dripping stops. If water continues to run or reappears at the filter housing, do not treat flushing as a repair for a bad seal. If the filter compartment itself stays dry but water appears below the fridge, check the manual’s troubleshooting guidance for the ice maker, supply tubing, and drainage. A slow dispenser, reduced ice production, or cloudy first glass can also have causes other than a leaking cartridge.
Check the housing before replacing a second cartridge
With the water off and the filter removed as directed, inspect the visible housing for cracks, broken tabs, a loose head, or a damaged sealing surface. Do not insert tools into the water port or probe a valve. If the housing is cracked, a tab is broken, the filter ejects when water is turned on, or water sprays from the head, close the supply and arrange service. A new cartridge cannot repair a damaged filter head. Repeatedly swapping filters can increase the spill and may damage the connector further.
If the replacement filter is the correct part and its seal looks intact but the leak returns, consider whether the filter head or water line was already worn. A technician may need to inspect the housing, valve, or tubing. Stop troubleshooting at home if you cannot safely close the supply, the leak is heavy, water reaches electrical parts, or the refrigerator continues leaking after the manufacturer’s installation steps. Keep the model number, filter code, photos of the wet area, and the time the leak starts; these details help support or service identify the correct part.
A conditional product example for GE MWF systems
For a refrigerator whose manual or old cartridge identifies the GE MWF connection, ICEPURE RWF0600A is one aftermarket example to compare—not a universal refrigerator filter. The Amazon listing currently presents a four-filter pack, while the selectable page includes other pack sizes and filtration variants. Amazon displayed 4.7 out of 5 stars from 5,737 ratings; that figure is a listing-level snapshot, and its review summary includes more than one selected pack or style. ICEPURE’s own model table identifies RWF0600A with NSF/ANSI 42 and 372, while the RWF0600AH variants carry additional claims. NSF’s directory lists the RWF0600A element for chlorine, taste, and odor reduction; it does not list the plain RWF0600A as the version with the RWF0600AH’s NSF/ANSI 53 claims.[3][5][6]
If your exact refrigerator model and previous cartridge code match the listing’s compatibility information, you can compare the current ICEPURE RWF0600A listing on Amazon. Check the selected model suffix, pack count, certification entry, and current return terms before ordering. A large review count is useful for spotting repeated complaints, but it cannot confirm fit in your refrigerator or prove a leak-free result for your unit. If your filter code is not MWF-compatible, skip this example and look up the correct cartridge instead.
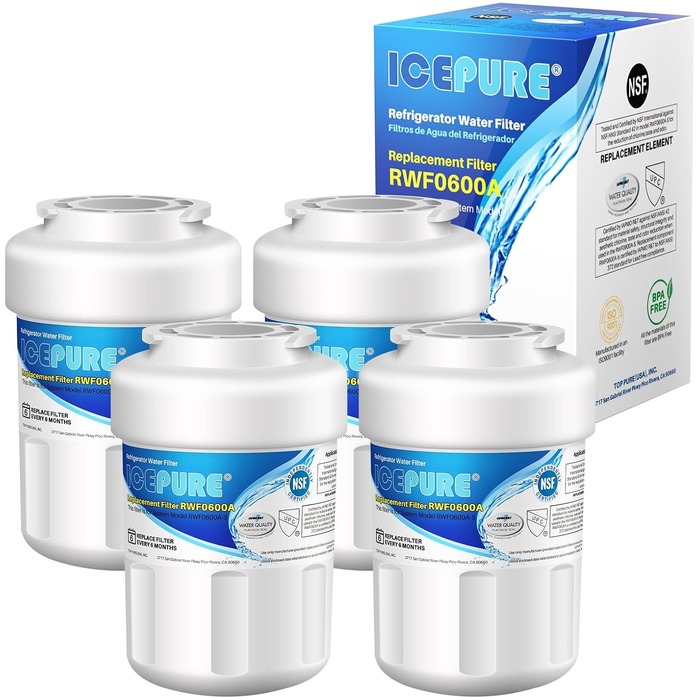
ICEPURE RWF0600A filter for GE MWF
An aftermarket cartridge for refrigerators that use the GE MWF connection. Compatibility is model-specific: match the full refrigerator model number and the old cartridge code before ordering.
- Role: Amazon consumer option
- For GE MWF systems
- Aftermarket part
- Verify model compatibility
- MOQ: Check current listing
A short leak check after installation
Once the filter is installed according to the manual, restore the water supply as instructed and keep the filter area visible. Follow the prescribed flush before drinking or using dispensed water. Check the connection while water is flowing, then check it again after the flush. Dry any water and look for fresh moisture at the filter head, housing, dispenser, and the floor beneath the appliance. Do not leave a suspected leak to “settle in.” If the connection stays dry but a dispenser drip continues beyond the manual’s stated purge behavior, or if water appears elsewhere, stop and follow the model-specific service guidance.
Keep a note of the refrigerator model, filter part number, installation date, and whether the leak appeared at the head, nozzle, or floor. That record makes the next scheduled replacement easier: compare the new cartridge with the one that worked, rather than relying on a generic brand name or a familiar package color. The practical fix is the correct cartridge, a clean undamaged seal, and the right lock position—not extra force.
Common questions
Can I keep using the refrigerator if the filter is leaking?
If water is actively leaking, close the appliance water supply when safe and stop dispensing until the source is corrected. A small dispenser drip after a filter change may have a model-specific purge procedure, but do not assume a wet filter compartment is normal. Protect nearby flooring and get service if the leak continues or you cannot isolate it.
Should a new refrigerator filter drip at first?
Some refrigerators can drip briefly from the dispenser after a replacement because air remains in the water path. Manufacturers may prescribe flushing to clear it. That explanation applies to the dispenser behavior described in the manual; it is not a reason to ignore water escaping at the cartridge connection.
Can I reuse the old filter to stop the leak?
Only reinstall it if the manual allows it and the cartridge, seals, and housing are undamaged. If the old filter seals and the replacement does not, compare the part codes and connectors. Do not keep an expired or damaged filter in service as a workaround; identify the correct replacement or request support.
Do all refrigerator water filters fit the same way?
No. Cartridge shapes, threads, push-in fittings, locking tabs, seal locations, and removal steps vary by refrigerator model. Match the full refrigerator model and filter code, and follow that model’s instructions.
Sources
-
Whirlpool, “What to Do if the Water Filter Is Damaged or Dripping.”
-
Samsung, “Prevent Leakage from the Refrigerator Water Filter.” Source
-
NSF International, certified drinking-water treatment unit listings for refrigerator filters. Source
-
Maytag, “How to Replace Your Refrigerator Water Filter.” Source
-
ICEPURE, “RWF0600A Refrigerator Filter Replacement for GE MWF.” Source
-
Amazon listing for ICEPURE RWF0600A
-
Frigidaire, “Refrigerator Water Leaks.” Source
-
LG, “Why Is My Water Filter Leaking?” Source
-
YouTube, AppliancePartsPros, “Fridge Leaking? Your Water Filter Could Be the Problem,” June 2026. Source
Hook this up to your favourite commenting platform — Giscus, Disqus, or your own.
Continue reading
Garbage Disposal Splash Guard Replacement: Check Fit First
Two guards can look identical in a photo and fit different disposers. Confirm the model, check whether the old guard lifts out at all, and treat universal as a seller's scope claim.
Dog Poop Bag Refills: Check Roll Fit Before You Buy
Bag width and length do not tell you whether a refill fits the dispenser. Compare roll diameter, usable width and the core before you buy a multipack.
Toilet Brush Refills: Check the Connection Before You Buy
A refill that will not fit is usually the wrong coupling, not a badly made brush. Identify the handle, compare the connector, and dry-fit before you trust the word universal.