Window Screen Spline Keeps Popping Out? Match the Cord to the Frame and Mesh
The cord that holds the mesh is sized to the frame groove, not to the window. Read the failure pattern, measure the channel, and test a few inches before you roll a whole screen.
 Lena Schmidt
Disclosure: We may earn a commission if you purchase through links on this page, at no additional cost to you.
First, make sure it is the spline that is moving
A window screen can come loose in two different places. The screen panel may be slipping out of the window opening, or the thin cord that clamps the mesh into the removable frame’s groove may be lifting out. This guide is about the second problem: the spline itself will not stay seated in the screen frame. If the whole panel is falling out of the window, inspect its tabs, springs, latches, or clips instead; changing spline will not fix that retention hardware.
A spline that rises at one corner after you finish rolling the screen is a different clue from one that walks out along a long edge over several days. The first often points to how that section was rolled, the tension at the corner, or a damaged channel. A long, repeated failure makes fit, mesh thickness, and groove condition more important to check. Those are useful starting clues, not a guarantee: more than one problem can be present at once.
Why the same cord can fit one frame and fail in another
Spline is the flexible retaining cord pressed over the mesh and into a narrow channel around a screen frame. It holds fabric by wedging into that channel. The fit depends on the groove, the profile of the spline, and the screen material being installed. That is why a kit labeled with one diameter is not automatically right for every window, even when the frames look similar.
For standard fiberglass or aluminum screen, Phifer’s sizing guidance starts with measuring the frame’s spline groove and matching the spline to that width. The manufacturer also lists material exceptions: for its aluminum or bronze screen and products such as PetScreen, SunTex, Super Solar, and TuffScreen, it recommends one diameter size smaller than the groove measurement. [1] This is manufacturer guidance for the listed materials, not a universal rule that every thick mesh always takes a smaller cord. Check the screen brand’s instructions where available.
The distinction matters because the cord is compressed as it rolls into the channel. The printed diameter is its uncompressed measurement; the assembled fit also depends on groove shape and how much room the fabric occupies. An oversized spline can be difficult to press down, wrinkle or damage mesh, or distort a frame. An undersized one may seat easily but fail to grip. Simply choosing a larger roll because the first one popped out can make the repair worse.
Use the old spline as a clue, not as the only measurement
If the existing spline is still intact, remove a short section and keep it. Note whether it is round, flat, or another shape, and measure its diameter without squeezing it. A caliper is more useful than a ruler for a small cord; if you do not own one, take the sample to a screen-repair or hardware shop and compare it without stretching. Also note its condition. Vinyl that has become brittle, flattened, cracked, or permanently stretched may no longer represent the original size accurately.
Next inspect the empty channel. Remove fragments of old spline and brush away dust, grit, and loose debris. Measure the groove as carefully as you can, but do not assume the visible top opening equals the groove’s full width. The channel may have a rounded or undercut profile. Product and frame makers may publish a chart for the particular system, and those instructions should outrank a generic kit chart. Phifer’s FAQ likewise says that, without an old sample, the screen product and the frame’s spline groove determine the size. [2]
A useful purchasing check is therefore three-part: identify the spline profile, compare the old sample and groove, then account for the mesh you are fitting. If those clues conflict—for example, the old cord measures larger than the manufacturer’s recommendation for a replacement pet screen—do not average the numbers. Follow the guidance for the exact mesh and frame combination, and test a short section before committing to the whole perimeter.
Do not rely on the frame’s outside dimensions to select spline. A 24-by-36-inch panel describes the screen’s overall size; it says nothing dependable about the narrow groove that retains the cord. Similarly, a roll of mesh may list a width or length that helps you decide whether it covers the panel, but it does not determine the spline diameter. Keep the measurements separate: frame opening for fabric coverage, groove and spline sample for retaining fit.
When taking a sample to a store, include the mesh you intend to use if possible. A cord can sit neatly in a bare channel and become too tight when fabric is folded beneath it. Conversely, a thinner mesh can change how much the spline compresses. This is why measuring the loose cord alone is a helpful reference rather than a complete fit test. The channel, the cord, and the fabric function as one small assembly.
Look closely at the shape before measuring. Most replacement kits show round vinyl cord, but some frames use flat or otherwise specialized retainers. A round cord with the right nominal diameter can still fail in a channel designed for a different profile. DIY repair threads include questions from people who discovered that the spline in their frame was flat or unlike the cord sold in a generic kit. Those posts are individual cases, not a sizing standard; they are a reminder to photograph the groove and take a sample when asking a supplier for help.
Read the failure pattern before buying another roll
If the spline will not press into the channel even with steady hand pressure, stop forcing it. It may be too large, the wrong profile, or blocked by debris. Repeatedly leaning harder on the roller can cut the mesh or bend a lightweight frame. Remove a few inches and check whether the groove is clean and whether the cord sits down when tested without fabric. If the channel is clear and the cord still stands proud, verify the size and shape before continuing.
If it rolls in with almost no resistance and springs back out, the spline may be too small or the channel may be damaged. Check whether the groove has opened, cracked, or been flattened, especially near a corner. On a metal frame, a burr or a crushed section can interrupt an otherwise good fit. A new cord will not reliably hold where the retaining channel has lost its shape; a replacement frame or a repair shop may be the more durable answer.
If the cord stays in an empty groove but pops out once mesh is added, the fabric and installation tension are part of the problem. A thicker replacement mesh occupies more of the channel. Pet-resistant and sun-control materials are examples for which Phifer specifies a smaller spline in its own guidance. [1] Also look for fabric pulled drum-tight across the frame. The spline has to retain the mesh without being asked to force an over-stretched panel into a narrow channel.
Install one edge at a time, with even tension
Set the frame on a flat surface and tape the replacement mesh lightly so it cannot drift. Leave enough overhang to trim later. The screen should be smooth, not stretched like a drum. Home Depot’s repair guide describes keeping the screen taut as the spline is inserted and notes that an old spline can be reused if it remains flexible and can be shifted back into place. [3] If the old cord is brittle or deformed, replacing it is more sensible than trying to make it grip again.
Use a spline roller that matches the task. Many screen tools have a concave wheel for guiding the spline and a convex wheel for pressing screen material into the channel; follow the tool’s own instructions, because tool shapes vary. Phifer’s installation guide shows the spline being rolled into the groove and advises cutting toward the outside edge of the channel when trimming, which helps avoid slicing the new fabric. [4] Work slowly along one side, then the opposite side, keeping the mesh aligned and only gently taut. Do not pull hard on the loose fabric while rolling.
Keep the roller square to the channel. If the wheel rides on the frame edge or angles sideways, it can push the spline out of the groove or nick the mesh. Apply steady pressure rather than trying to bury the cord in one forceful pass. If it starts to walk out, stop immediately and inspect that point. Re-rolling over a raised cord can trap a fold of fabric underneath, leaving a bump that will likely lift again when the panel is handled.
Do not trim the mesh close to the groove until the spline is fully seated around the perimeter. Once it is secure, cut along the outside edge of the channel with a sharp utility blade, directing the blade away from the screen fabric as the manufacturer’s instructions advise. A dull blade or a cut made toward the new mesh can turn a sizing repair into a second rescreening job. Keep your other hand clear of the blade path and avoid pulling the fabric while cutting.
Pay attention at corners. Corners need short, controlled roller passes because the mesh can bunch where the two frame channels meet. Do not solve a lifted corner by forcing extra spline into it or by pulling the mesh diagonally. Back up a few inches, release the tension, smooth the mesh, and roll the corner in small controlled passes. Leave the final join neat and fully seated; do not overlap a bulky knot of spline unless the frame system calls for it.
After one side, pause and look across the frame. The bars should remain straight, the fabric should be even, and the spline should sit level with the frame channel rather than visibly perched above it. If the frame has bowed inward, release that side and reset the tension. A mesh that is too tight can pull the frame out of square; tension is part of the fit, not a cosmetic finishing step.
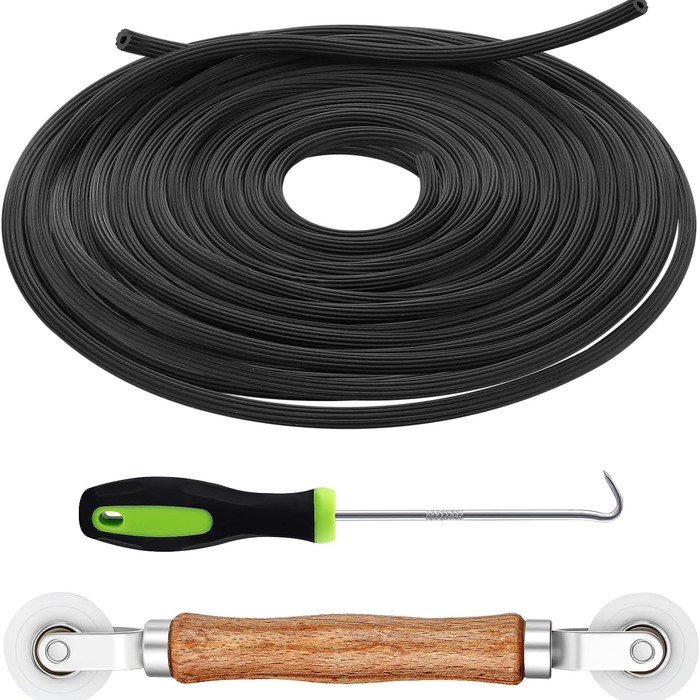
MEWTOGO 3-in-1 screen repair kit
An assortment kit with spline cord, a roller and a removal hook, sold for window and door screen repair. The cord diameter still has to match your frame groove, so check the selected variant against your measurement.
- Role: Amazon consumer option
- Spline assortment
- Roller included
- Removal hook
- MOQ: Check current listing
When an assortment kit helps—and when it does not
A multi-size kit is useful when the frame’s size is uncertain, when you are repairing several screens, or when you need a roller and removal hook as well as cord. It is a poor substitute for measuring. One currently listed example is the MEWTOGO 3-in-1 screen repair kit, whose product page describes a roller, removal hook, and spline in.125-inch and.14-inch options. Those are the listing’s stated options; they do not establish that either diameter fits your particular frame. Choose the variant only after checking the old spline, groove, screen type, and product instructions.
If you already own a suitable roller, buying the correct length and diameter of spline alone may be simpler and leave less unused material. If you are repairing one small screen, a local shop may be able to match a sample. If you are doing several windows, measure each frame before assuming they all use the same channel; replacement windows, storm panels, and older screens can differ even within one house.
A quick decision path
Before starting over, run through these checks in order: Is the spline itself lifting, rather than the whole screen panel leaving its window track? Is the frame groove clean and intact? Does the cord match the groove and profile? Does the replacement mesh call for a different size under its manufacturer’s guide? Does the spline sit securely in a short test section with the mesh in place and gentle, even tension? This sequence avoids replacing a part when the actual fault is a dirty channel, incompatible fabric, damaged frame, or rushed corner.
Before rolling the full frame, test a few inches of spline at a straight, undamaged section with mesh underneath. Use the same roller and gentle pressure intended for the full repair. Stop and remove it if fabric starts cutting, the frame bows, or the cord keeps rising. This brief test cannot prove every part of the channel is sound, but it can reveal a clear size or profile mismatch before you trim away usable fabric.
If the cord stays seated on three sides but repeatedly lifts at one damaged point, inspect the channel there rather than ordering progressively larger spline. If it lifts along the whole perimeter after a mesh change, revisit the product’s sizing chart and reduce excess fabric tension. If the screen panel—not the cord—falls out of the window, return to the frame’s clips, springs, or latches. These distinctions turn a frustrating repeat repair into a small, targeted diagnosis.
Sources
-
Phifer, “How To Choose The Right Size Of Screen Spline” and “Screen Rollers and Spline.” Sizing exceptions are specific to Phifer’s listed screen products. Source
-
Phifer, “Insect Screening FAQ.” Source
-
The Home Depot, “How to Repair or Replace Screens.” Source
-
Phifer, “How to Replace or Repair a Window or Door Screen.” Source
-
Stesso, “Insert Spline into Grooved Screen and Channel — Window Screen Repair (Step 3, Video 1).” Video tutorial and associated repair FAQ. Source
Hook this up to your favourite commenting platform — Giscus, Disqus, or your own.
Continue reading
Do Washing Machine Anti-Vibration Pads Stop Walking?
A pad that has shifted out from under the washer is a symptom, not the diagnosis. Check the machine is stable and the foot fits the cup before buying a grippier set.
When a Silicone Faucet Mat Pools Water, Check the Fit and Drain Path
A mat that holds a puddle is failing at one of three points: the counter does not drain toward the bowl, the mat is set the wrong way, or its outlet is blocked.
How to Keep a Cutting Board From Sliding on a Countertop
Most boards move because of a film of water or oil, a warped corner, or an overhang, not because the board is light. Find the cause, then pick a damp cloth or a grip pad.