Bottle Lid Cleaning Brushes and 7 Checks Before You Buy
Match the brush head to the channel under the lid, check whether the gasket comes out, and plan how the brush itself gets cleaned.
 Lena Schmidt
Disclosure: We may earn a commission if you purchase through links on this page, at no additional cost to you.
A bottle brush can leave the inside of a reusable bottle looking clean while barely touching the narrow channel underneath its lid. Buying a longer brush will not necessarily solve that problem. The missing feature may be a narrower working head, a different approach angle, or access beneath a removable seal.
For exposed threads and shallow recesses, start with a small detail brush intended for drinkware. For a deep, narrow channel, check whether its bristles can reach the bottom without the handle or wire pressing against the lid. A gasket remover is useful only when the bottle manufacturer allows that gasket to come out.
This guide focuses on choosing and using a brush for bottle lids, sealing grooves and drinking openings. It does not rank whole-bottle cleaning kits by piece count or promise that brushing will sterilize a lid. The useful purchase is the tool that reaches the part you currently miss and leaves the lid functioning correctly afterward.
1 Identify the surface your current brush misses
Remove the lid and look at it in good light. Locate the actual residue before choosing another tool. Is it on an exposed screw thread, at the bottom of a circular groove, behind a removable gasket, or inside a drinking passage? Those locations require different access.
This is a real distinction in everyday use. In a Reddit discussion, a Stanley tumbler owner described being able to clean the bottle and straw but struggling with lid spaces that were too narrow for the straw brush and too deep for toothbrush bristles. That individual report identifies a fit problem; it does not establish that all Stanley lids are difficult to clean.
Try to describe the missed area without naming a product: “a narrow open groove beneath the seal” is more useful than “a dirty lid.” You can then look for photographs showing a brush working in a comparable shape. A picture of a brush beside a bottle tells you very little about access beneath its lid.
Also check whether the apparent gap is actually a joint between permanently assembled pieces. Do not push a brush into a seam simply because it is visible. If the care instructions do not explain how that area should be cleaned, ask the manufacturer before attempting to separate it.
2 Check removal instructions before buying a gasket hook
A brush cannot scrub a surface covered by a seal. Where removal is permitted, taking the gasket out may improve access more than switching to a stiffer brush. Where removal is prohibited, a hook does not make disassembly appropriate.
Ever Vessel’s gasket guide explicitly tells readers to check whether their particular seal was designed for removal. It also distinguishes washing the gasket from cleaning the empty channel underneath it. Those are separate surfaces, and cleaning only the exposed edge leaves the other surface unexamined. [1]
Keep the lid’s model information nearby. Similar-looking lids may have different assemblies, and instructions for a straw tumbler should not automatically be applied to a pressure-operated travel mug. Use the maker’s disassembly sequence, including any pull tab or release position it specifies.
Before removing an approved component, photograph its orientation. Place it in a small clean dish rather than directly beside the drain. This makes it easier to keep track of a ring that becomes difficult to see when wet.
Treat a removal hook as a separate purchase feature, not proof of better cleaning. If you already lift the approved gasket easily with its tab, that attachment may add nothing. If removal requires force or begins to distort the seal, stop and check the instructions rather than trying a sharper implement.
3 Compare the working head with the channel
Overall brush length is a poor guide to lid fit. A long handle may help reach the bottom of a bottle, but it does not tell you whether the head can enter a narrow sealing groove.
Look at the width of the bristle section, the thickness of the backing or central wire, and the length of bristles available to reach downward. These features work together. A thin handle with a broad bristle head may suit an open recess; a bulky backing may prevent even long bristles from reaching a deep channel.
Measure the accessible opening if you can do so without forcing anything into it. A ruler beside the lid can also help explain the problem to a seller. Ask for working-head dimensions when a listing gives only the tool’s total length. Do not treat a product photograph as a precise scale drawing.
There is no single brush diameter that fits every bottle lid. Flexible bristles can bend, but that does not mean the rigid part of the tool can safely follow them into the same space. During a gentle trial, the bristles should contact the intended surface without requiring the backing to scrape along it.
Consider the route out as well as the route in. A brush that wedges under a lip may be awkward to withdraw. If it catches, stop rather than twisting harder. A different head shape or approved disassembly may be the better answer.
4 Choose a head shape that follows the surface
For an exposed thread, a small brush with accessible bristle tips lets you work along the thread rather than sweeping over its highest points. Rotate the lid as you work so you can see the section being cleaned. Keeping the same grip throughout can leave one awkward patch untouched.
A flat or angled detail head can be useful around shallow corners and the underside of a broad lid. A narrow cylindrical brush may suit an open passage or a channel that accepts its shape. These are starting points for selection, not universal compatibility rules.
An ordinary clean toothbrush reserved for drinkware may already reach a broad, open recess. Check its head and neck against the lid before buying something else. If only the bristle tips touch the rim while the head bridges the groove, replacing it with another similarly shaped brush is unlikely to solve the access problem.
Do not confuse a drinking valve with an ordinary hole. CamelBak specifically warns against forcing a bottle brush through the slit of its Big Bite valve because doing so can tear the silicone. Its care instructions describe removing and washing the relevant components instead. That model-specific warning is a useful reason to check the mechanism before pushing a narrow brush through it. [2]
Where a passage cannot be inspected or cleaned by the permitted method, contact the bottle maker. A tool advertised for tiny gaps is not evidence that it belongs inside every valve.
5 Inspect contact points and control
The bristles are only part of the tool. Examine the tip, backing, wire and any folding joint. A small brush becomes a poor match if a rigid edge contacts the lid before the bristles reach the residue.
Before first use, look for protruding wire, loose bristles or a rough edge. Do not use a damaged brush against a sealing surface. A seal must fit back into the channel afterward, so avoid treating that channel as a place for aggressive scraping.
Handle length also changes how the tool feels. For a lid held over the sink, a short handle may offer useful control. A longer handle may be comfortable for someone who finds a tiny tool difficult to hold. Neither arrangement is inherently superior; check whether you can keep the head where you want it without squeezing the lid awkwardly.
Use light, deliberate strokes and inspect the result. If the bristles repeatedly skate over the dirty area, reconsider access and shape before applying more pressure. More force does not correct a head that is too wide to reach the groove.
Be cautious about broad “non-scratch” language. Compatibility still depends on the actual tool, its condition, the lid material and the way it is used. Choose a brush intended for this cleaning task and follow both products’ instructions rather than assuming a claim covers every surface.
6 Decide whether you need a set or one detail tool
If your existing bottle and straw brushes work, a compact lid tool may fill the remaining gap. If you lack all three, a coordinated set can be convenient. Count the tasks it covers rather than the number of attachments in the package.
The OXO Good Grips Water Bottle Cleaning Set is one candidate for the second situation. OXO lists a bottle brush, straw brush and detail cleaner, all with nylon bristles, stored on a ring from which they detach. The detail cleaner is specifically intended for cap and lid crevices. That makes the set relevant to this task, though it does not establish compatibility with a particular narrow groove. [3]
View the OXO Water Bottle Cleaning Set on Amazon
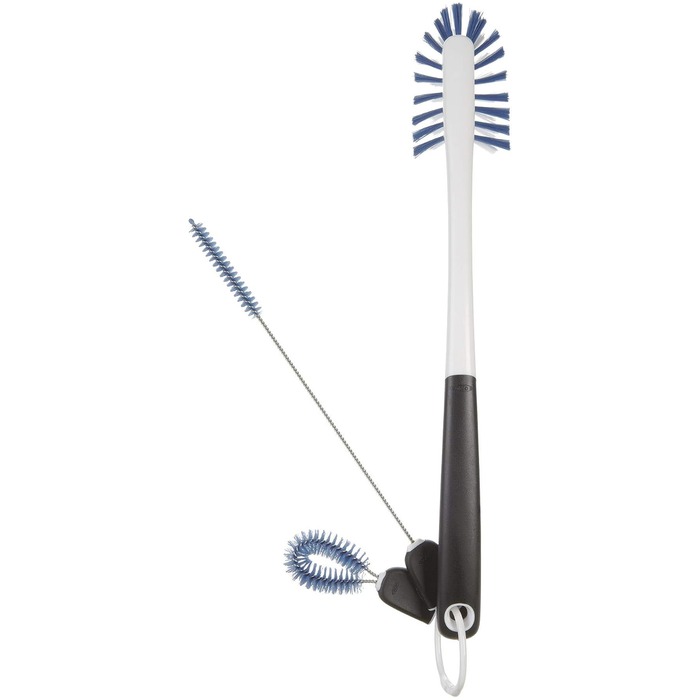
OXO Good Grips water bottle cleaning set
A bottle brush, straw brush and detail cleaner, all with nylon bristles, stored on a ring from which they detach. The detail cleaner is the part intended for cap and lid crevices; the body brush is a different job.
- Role: Amazon consumer option
- Three tools on a detachable ring
- Nylon bristles
- Detail cleaner for lids
- MOQ: Check current listing
The MARNA K683W Multipurpose Bottle Cleaning Brush takes the compact approach. Its official page describes an angled corner brush, a narrow gap brush and a gasket-removal feature. MARNA also cautions users not to damage the gasket when using the remover. It is worth comparing if the lid is the only part your existing tools cannot handle. [4]
View the MARNA Bottle Cleaning Brush on Amazon
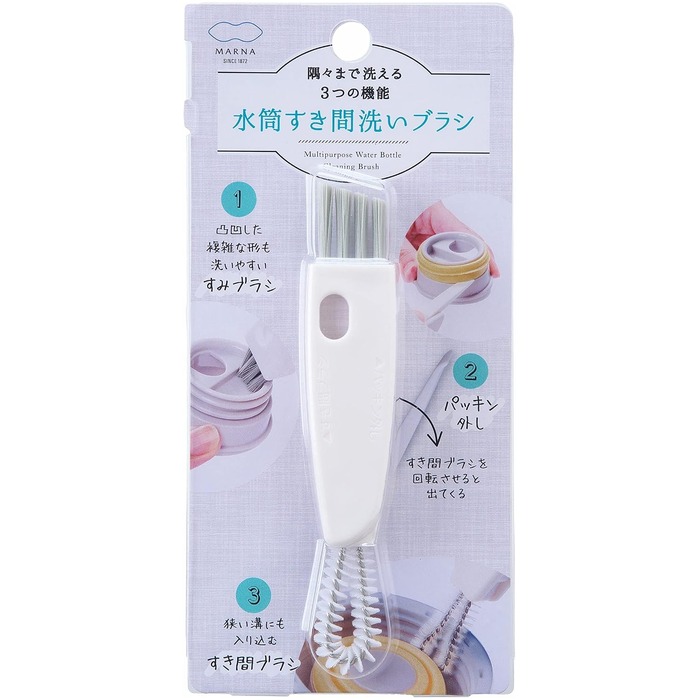
MARNA K683W multipurpose bottle cleaning brush
A compact tool that combines an angled corner brush, a narrow gap brush and a gasket-removal feature. MARNA also cautions users not to damage the gasket with the remover, which matters on lids you cannot replace separately.
- Role: Amazon consumer option
- Angled corner brush
- Narrow gap brush
- Gasket-removal tip with a caution
- MOQ: Check current listing
These products are researched candidates, not tools tested side by side for this article. Their different layouts matter more here than a supposed overall winner. OXO adds separate tools for the bottle body and straw; MARNA concentrates several functions into a small lid-cleaning tool.
Before ordering, compare the actual head with your lid and check the current seller’s photographs, model and return terms. A large set is poor value if its smallest usable head still cannot reach your groove. A compact tool is equally unhelpful if the handle prevents you from approaching the recess.
Avoid buying both immediately unless they solve separate problems. Start with the missing function, try it against the intended lid without force, and keep the packaging until you have checked fit under the seller’s return conditions.
7 Plan how the brush will be cleaned and dried
A lid brush should be easy to rinse after use. Inspect places where residue could collect around the bristle base or folding joint. A tool with several attachments may save space, but you still need to clean and dry the parts you actually use.
Read the brush’s care directions separately from the bottle’s. A dishwasher-safe lid does not make its cleaning tool dishwasher-safe. Likewise, a stated heat-resistance temperature does not, by itself, establish permission for boiling, sterilizing or dishwasher use.
MARNA directs users to rinse its brush, drain it and let it dry after use. The tool includes a hanging hole, which gives you one practical storage option if there is space for it to dry freely. [4]
Choose a location before buying. A wet brush pushed into a crowded drawer is inconvenient to inspect and retrieve. A hook or open holder can make it easier to see whether the head is clean and dry, provided it is positioned away from splashes and other dirty tools.
Keep a drinkware brush separate from brushes used for drains, grout or other household cleaning. When bristles become permanently splayed or the tool develops damage, reassess whether it still reaches the intended surface. There is no useful universal replacement date for every brush and pattern of use; condition and the manufacturer’s directions are better guides.
Put the new brush through one complete cleaning cycle
Start with one lid rather than dismantling every bottle in the cupboard. Follow its care instructions and remove only the permitted pieces. Wash the exposed surfaces with the recommended cleaning method, using the new brush where its head fits comfortably. Work around the entire channel instead of repeatedly scrubbing the most visible section.
Rinse, then inspect in good light. Look for remaining debris in the groove and between threads, and check that no brush bristles have been left behind. A persistent mark is not automatically proof that more scrubbing is needed. If you cannot tell whether it is residue, staining or damage, ask the manufacturer rather than escalating to an abrasive tool.
Let the parts dry as directed before storage or reassembly. Ever Vessel’s guide emphasizes correct gasket orientation and an even fit without bunching, twisting or folding. [1] Once reassembled, check the lid’s operation according to its instructions before returning the bottle to a bag.
If the problem remains, name the failure precisely. Bristles that never touched the groove suggest a fit issue. A brush that reached the surface but left residue calls for a review of the permitted cleaning method. A lid that leaks after reassembly needs its seal and assembly checked, not another cleaning brush.
The right tool makes this routine easier to repeat. It reaches the missed surface, rinses clean afterward and lets you put the lid back together without damage. That is a more useful buying standard than the longest handle, the stiffest bristles or the largest accessory count.
Sources
Hook this up to your favourite commenting platform — Giscus, Disqus, or your own.
Continue reading
Do Washing Machine Anti-Vibration Pads Stop Walking?
A pad that has shifted out from under the washer is a symptom, not the diagnosis. Check the machine is stable and the foot fits the cup before buying a grippier set.

When a Silicone Faucet Mat Pools Water, Check the Fit and Drain Path
A mat that holds a puddle is failing at one of three points: the counter does not drain toward the bowl, the mat is set the wrong way, or its outlet is blocked.
How to Keep a Cutting Board From Sliding on a Countertop
Most boards move because of a film of water or oil, a warped corner, or an overhang, not because the board is light. Find the cause, then pick a damp cloth or a grip pad.