A Door Sweep That Peels Off May Be the Wrong Sweep for the Threshold
Pressing a failed strip back on rarely fixes the cause. Read the failure pattern, measure the gap, and decide whether the door wants an adhesive lip or a mechanically retained seal.
 Lena Schmidt
Disclosure: We may earn a commission if you purchase through links on this page, at no additional cost to you.
If a self-adhesive door sweep keeps falling off, pressing it back onto the door rarely fixes the cause. The strip may be stuck to dust, oil, moisture, or a weak coating. It may also be scraping a raised threshold or carpet every time the door moves. First look at where the seal is lifting and how the closed door meets the floor. That tells you whether to prepare the surface again, trim or reposition the sweep, or switch to a different mounting style. A door bottom seal should close the visible gap without making the door drag hard.
Start by identifying what has actually come loose
“Door sweep” can mean several products. A peel-and-stick vinyl or silicone strip attaches to one face of the door. A screw-on sweep uses a rigid rail and replaceable flexible insert. A kerf-in seal pushes into a narrow groove cut into the door bottom. A slide-on model wraps around the door edge. These are not interchangeable just because they all sit near the floor. The Building America Solution Center lists adhesive, screw-mounted, kerf, and wraparound designs among common door-sweep types; the door’s construction and threshold determine which can work. [1]
If a strip is peeling, note the failure pattern before removing it. A corner that lifts first often points to a rough cut, a curled end, or contact with a threshold edge. A long section lifting from the door face suggests poor surface contact, contamination, or a coating that is separating. If the strip is still attached but bows outward when the door closes, it may be installed too low or be too thick for the available clearance. If the entire sweep catches on carpet, the adhesive may be doing its job while the chosen geometry is wrong.
Open and close the door slowly while watching the seal. Notice whether the lower edge slides freely, brushes the floor, or gets pushed sideways. Do this on the actual floor covering, not with the door held open. A sweep that seems fine in the middle of its travel can catch at a rug edge or a high spot near the jamb. Do not keep using a door that suddenly needs force to latch; excess drag can damage the strip and make the door difficult to operate.
Check the gap before buying another strip
Close the door and measure the clearance between the bottom of the door and the threshold at the hinge side, center, and latch side. A sloped floor or a door that has sagged can leave three different gaps. Also check whether the threshold itself is adjustable. Measuring at one point can lead you to choose a seal that touches the floor at one end but leaves daylight at the other.
Measure the door width along its bottom edge as well. Many adhesive sweeps are sold in a standard length and can be trimmed, but the cut has to leave the sealing lip straight and clear of the jamb. Duck Brand’s installation guide instructs users to measure the door, cut a sweep to length when needed, mark its position with the door closed, and check for gaps after application. [2] Treat those steps as guidance for that product family; follow the instructions supplied with the sweep you buy.
The goal is contact, not heavy compression. With the door shut, the flexible lip should meet the threshold closely enough to close the intended gap. If it is forced hard against the floor, the door can drag, the seal can fold, and repeated movement can peel an adhesive edge. If there is a large or uneven opening, a thin stick-on strip may not have enough reach. A screw-adjustable sweep, an insert made for a kerf, or a threshold adjustment may be the better repair.
A door sweep only addresses the bottom edge. If air is coming around the sides or top, adding a thicker bottom strip will not seal those paths. The U.S. Department of Energy’s Building America guidance treats the sweep as one part of the door air-sealing assembly and distinguishes it from perimeter weatherstripping. [1] Check for the actual leak before treating the bottom as the only problem.
Inspect the surface and the old adhesive
Adhesive needs close, continuous contact with a suitable surface. Dust, grease, cleaning residue, dampness, loose paint, and leftover tape can all create a weak layer between the adhesive and the door. A painted door can appear smooth while the paint itself is chalking or lifting. On a textured or deeply grained surface, a flat adhesive strip may touch only the high points, leaving less contact area than its full width suggests.
Remove the failed strip slowly so it does not pull off sound paint or veneer. Use the removal method allowed by the product maker and door finish. Scrape adhesive with a plastic tool rather than a metal blade, and test any cleaner in a hidden spot. Solvents can soften some finishes and plastics. If the paint comes away with the adhesive, stop: the new strip would be bonded to a failing coating, not the door. Repair the coating or choose a mechanical mounting method that suits the door.
Clean the bonding area as the sweep manufacturer directs, then let it dry completely. Do not assume that a strong-smelling cleaner is automatically better; it might leave a film or damage the finish. 3M’s general bonding guidance explains that dry, uncontaminated surfaces and firm pressure improve adhesive contact, while time and temperature affect the bond. Those are adhesive principles, not a universal temperature or cure-time specification for every door sweep. Use the temperature range and waiting period printed for the exact product. [3]
Match the seal to the floor and door movement
A flexible adhesive lip can be a reasonable choice when the door bottom is smooth, the clearance is fairly even, the floor is hard and level, and the seal does not need to be pushed aside each time the door moves. It is less attractive when a door crosses thick carpet, a raised transition, or an irregular threshold. In those conditions, dragging force can act like a peel tab at the edge of the adhesive.
If the door has a groove along its bottom, find out whether it takes a kerf-in replacement. These seals are held by the groove rather than a full-length adhesive bond. If the existing sweep is attached with screws, replace it with a compatible screw-mounted style or adjustable rail. A screw-mounted product also makes later repositioning possible, which matters when the gap changes across the width. Do not drill into a hollow-core or fire-rated door without confirming that the work is appropriate for that door.
For a renter or someone who cannot drill, a removable adhesive sweep may be convenient, but “no-drill” does not mean surface-proof. Check the allowed door material, finish, gap range, and removal instructions. An adhesive strip that is too large for the clearance can rub every time the door closes; one that is too small may leave a gap even if it stays attached.
The failure pattern also appears in owner reports. One Home Depot reviewer says a self-adhesive sweep came off after two door closures; a Reddit discussion about a repeatedly failing exterior-door seal points readers toward checking for a kerf channel and using a press-in replacement. Those are individual experiences, not failure-rate data, but they show why repeating the same adhesive installation is not always the answer. [4]
One current product example is the GroTheory two-pack self-adhesive silicone door sweep, listed in 39-inch lengths. The seller presents it as a cut-to-fit door-bottom seal; confirm the current color, dimensions, stated gap range, and included pieces on the product page before ordering. It is a candidate only for a door and floor that match the listing’s limits. Its listing is not evidence that it will adhere to every paint, texture, or threshold.
Reinstall it without loading the adhesive edge
Dry-fit the replacement before removing its backing. Close the door, hold the seal in its intended position, and mark a level reference line. Check the latch, the jamb, and the clearance across the full swing. If you need to pull the flexible lip away from the floor to make the door move, raise or reposition the sweep; do not rely on adhesive strength to overcome constant friction.
Cut only after measuring twice. Use the tool recommended for that material and keep the cut square. A long, ragged end can catch a jamb or rug and begin lifting. Some products have separate end caps or a specific trim allowance, so do not copy a cutting method from a different style. Duck Brand’s instructions show measuring, marking, applying, and then checking the seal at the threshold; they do not make the product universal across every door design. [2]
Apply the strip to a clean, dry surface within the manufacturer’s stated installation conditions. Peel the backing a little at a time if the instructions allow it, align to your mark, and press firmly along the full length. Avoid stretching the strip as you apply it. A stretched seal can pull back as it relaxes. Keep fingers and dust off the exposed adhesive. If the product specifies a set period before use, let it sit undisturbed; operating the door early can pull at an incompletely bonded edge.
After the waiting period, close the door gently and inspect the contact line. The seal should not fold under itself or prevent the latch from engaging. Run a thin piece of paper along the closed edge as a simple check for obvious open sections, then open and close the door several times. This is a practical fit check, not a laboratory air-leak test. If the sweep shifts, stop and inspect the clearance and contact pattern instead of pressing the loose part back down repeatedly.
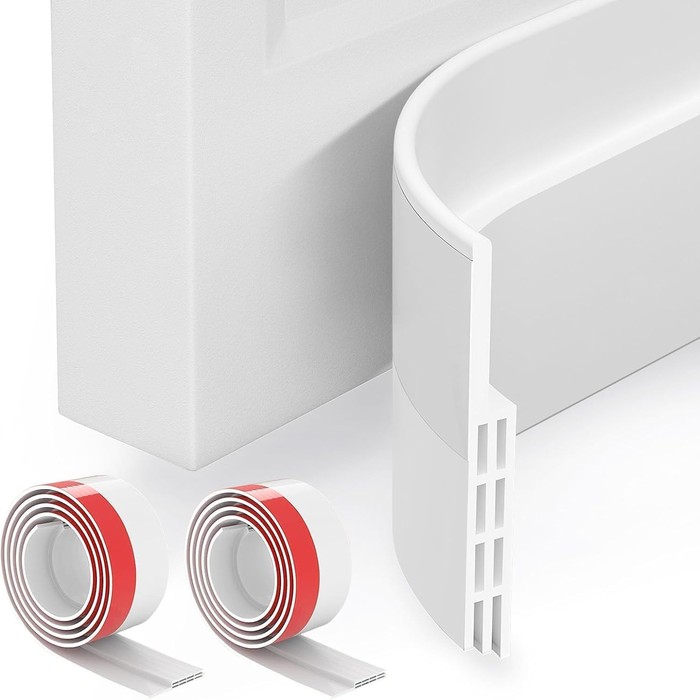
GroTheory 2-pack self-adhesive door sweep, 39 in
A two-pack of cut-to-length silicone sweeps with an adhesive backing. It suits a smooth door face and an even gap; a rough finish, a sloped threshold or a door that moves will still pull the strip loose.
- Role: Amazon consumer option
- 2-pack
- 39-inch lengths
- Cut to fit
- MOQ: Check current listing
Video can help identify what is being installed: a YouTube walkthrough compares two common bottom-seal arrangements. Use a demonstration to understand placement, then rely on the specific product instructions and a door-operation check to judge fit; a video is not a durability test. [5]
Do not cover a failed factory adhesive with construction glue, silicone caulk, or another tape unless the door-sweep maker approves that combination. A new adhesive may bond to the residue rather than the door, and a permanent glue can make future removal damage paint or veneer. It can also hold the sweep at the wrong height, leaving it to scrape the threshold. Remove the old adhesive as directed, test the finish, and choose a compatible replacement. If the product depends on adhesive and the surface will not support it, change the mounting method instead of stacking adhesive layers.
When a different repair is the better answer
Replace the adhesive sweep if the backing is contaminated, the strip is permanently curled, or the adhesive has lost tack after removal. Do not layer a new strip over old adhesive and expect a dependable bond. If the door face is rough, oily, flaking, or incompatible with the product, a screw-mounted or kerf-in sweep is more appropriate. If the bottom gap varies sharply, consider correcting the door alignment or threshold rather than stacking soft seals.
A sweep that seals only when the door is forced shut is not a good fit. It can raise closing effort, scrape the floor, or interfere with the latch. The Building America Solution Center recommends positioning a door sweep so the edge meets the threshold, then checking that the door opens and closes comfortably; its guide focuses on mechanically attached sweeps, so use it for the fit principle and the product manual for adhesive installation. [1]
For a damaged exterior door, a loose threshold, rot, cracked glazing, or a gap that changes because the door is sagging, the sweep may not be the source of the problem. Fixing the door or threshold first can be safer and longer-lasting. If the door is fire-rated, part of a required building separation, or part of a rental property, check the manufacturer or property manager’s rules before modifying it.
A quick diagnosis before you stick anything down
If one end peels, check the cut, jamb clearance, and threshold height at that end. If a long section releases from the door, inspect the surface coating and residue. If the seal stays attached but drags, it is too low, too thick, or poorly matched to the floor. If the bottom looks sealed but you still feel a draft, inspect the sides and top of the frame. These checks take less time than repeatedly buying a wider strip and finding that the door will not close.
Use an adhesive sweep when the surface is suitable and the door can move without pulling on it. Choose a mechanically retained style when the door is textured, the gap is uneven, or contact force is high. The right fix is the one that closes the gap while letting the door operate normally; extra adhesive alone cannot correct a clearance problem.
References
-
Pacific Northwest National Laboratory, Building America Solution Center, “Install or Replace Door Sweeps.” Source
-
Duck Brand, “How-To Install: Adhesive Door Sweeps.” Source
-
3M, “Substrate Surface Consideration for Adhesive Selection.” Source
-
Home Depot customer review for M-D self-adhesive door sweep. Source
-
YouTube, “How To Install BOTTOM DOOR SEALS—2 TYPES!!” Source
Hook this up to your favourite commenting platform — Giscus, Disqus, or your own.
Continue reading
Do Washing Machine Anti-Vibration Pads Stop Walking?
A pad that has shifted out from under the washer is a symptom, not the diagnosis. Check the machine is stable and the foot fits the cup before buying a grippier set.
When a Silicone Faucet Mat Pools Water, Check the Fit and Drain Path
A mat that holds a puddle is failing at one of three points: the counter does not drain toward the bowl, the mat is set the wrong way, or its outlet is blocked.
How to Keep a Cutting Board From Sliding on a Countertop
Most boards move because of a film of water or oil, a warped corner, or an overhang, not because the board is light. Find the cause, then pick a damp cloth or a grip pad.