How to Keep Brown Sugar Soft: Storage, Clay Savers, and Quick Fixes
A reliable seal, a dry cupboard and the right saver matter more than any rescue trick for hardened brown sugar.
 Lena Schmidt
Disclosure: We may earn a commission if you purchase through links on this page, at no additional cost to you.
The short answer
Brown sugar stays soft when it is protected from drying out. Close the original bag tightly, then place it inside a genuinely airtight container, or transfer the sugar to a clean, dry canister with a close-fitting lid. If you open the container often or live in a dry climate, a food-safe terracotta sugar saver can help maintain moisture between uses. The seal does most of the work; the saver is an optional helper. If the sugar has already hardened, soften only the amount you need and return the rest to airtight storage.
Why brown sugar turns hard
Brown sugar contains molasses, which gives it its characteristic color, flavor, and soft, slightly clumping texture. Once the package is opened, moisture gradually escapes into the surrounding air. The sugar crystals then bind into a firm mass. That is why a bag left folded loosely in a pantry can become difficult to scoop, even though nothing was spilled into it.
Hardening is usually a texture problem rather than proof that the sugar has spoiled. Still, discard sugar if you see mold, signs of pests, or any contamination; do not try to rescue a product that has been exposed to water or an unclean utensil. The practical goal is not to make sugar airtight forever. It is to reduce repeated exposure to dry air during storage and everyday use.
Choose a container that fits the way you bake
For occasional baking, keep the sugar in its original bag, press out excess air without compressing it into a brick, fold the top several times, and secure it with a strong clip. Put the bag inside a lidded container. This second barrier is useful because bag closures are easy to reopen imperfectly, and the outer container catches small spills. Choose a container that is easy to open with one hand and large enough to hold the bag without forcing the lid.
If you use brown sugar frequently, a dedicated canister makes scooping easier. Transfer it only into a clean, completely dry container. A lid that sits loosely on top is not equivalent to an airtight seal; look for a gasket or a closure that locks down evenly. Before buying, check the usable capacity against the amount you normally keep. A canister that is awkwardly full, difficult to clean, or too large for the pantry is likely to be left open more often.
There is no need to vacuum-seal a small household supply. The useful test is simple: after each scoop, can you close the container fully and quickly? Put the canister away from the stove, dishwasher steam, sink splashes, and direct sunlight. Warmth itself is not the main issue here; frequent exposure to changing air and moisture is. Keep the storage area dry and use a clean, dry spoon so that you do not add water or crumbs.
When a clay saver helps
A terracotta sugar saver is a small porous disk or shape that is soaked briefly in water and then placed with the brown sugar. The clay takes up water and gradually releases moisture into the enclosed space. That can slow drying between uses, especially when a container is opened repeatedly. It does not repair a poor seal, and it is not a substitute for closing the lid.
Follow the instructions supplied with the specific saver. Products differ in size and in how long they should be soaked. For the Brown Sugar Bear, the maker’s directions describe soaking it for about 20 minutes, wiping the surface, and placing it with the sugar. Treat that as product-specific guidance rather than a universal schedule for every clay disk. Do not leave a wet object dripping in sugar, and do not use a decorative clay ornament unless it is explicitly made for food contact.
A small saver makes sense if you bake often, have had repeated hardening despite careful closure, or prefer a simple reusable aid over replacing a slice of bread. It may be unnecessary if you store a small amount in a sound sealed container and use it quickly. The Brown Sugar Bear is one example of this product type. If the container seal is the weak point, replacing the container matters more than adding a saver; both routes are compared under how to choose a sugar saver below.
A practical routine is to inspect the sugar when you open the canister. If it is still soft and the saver is dry, close it again. Refresh the saver when the sugar begins to firm up or when its own instructions recommend doing so. Fixed calendar intervals are not reliable for every kitchen because humidity, container seal, and frequency of opening vary.
How to soften sugar that is already hard
If you need the full batch soft again, move it to a microwave-safe bowl, cover it with a barely damp paper towel, and heat in short bursts. Check and break up the sugar between bursts; it can warm unevenly, and too much heat may melt or dry it. Use the softened sugar promptly, then store it in a sealed container. Microwaving is a quick recovery method, not a lasting storage solution.
For a slower approach, put the sugar in an airtight container with a small piece of fresh bread for several hours or overnight. The sugar can take up moisture from the bread. Remove the bread once the sugar is soft, and do not leave it in the container as a permanent keeper. Fruit slices and marshmallows are also common suggestions, but they introduce perishable food into a pantry ingredient. If you use one temporarily, check it and remove it as soon as the sugar softens; do not let it become forgotten in the canister.
A food-safe terracotta saver can also soften a firm batch gradually, but it takes longer than a microwave. If you need only a spoonful for a recipe, break off that amount and soften it separately rather than repeatedly warming the entire supply. Once the sugar is pliable, protect it from air again. Otherwise, it can harden a second time.
What not to rely on
A clip alone may work for a short time, but it leaves the folded bag as the only barrier. If the closure is loose or the bag is punctured, the sugar continues to dry. Storing it in a decorative jar without a close-fitting lid has the same weakness. A moisture saver placed in an open bowl cannot compensate for constant air exchange.
Bread, apple, and marshmallow methods are temporary re-softening tricks, not ideal long-term storage systems. They can help in a pinch, but each adds another item that must be monitored and removed. A damp towel left in direct contact with sugar can make the surface wet or sticky, so use it only for brief microwave softening and remove it immediately afterward. Avoid splashing water into the storage container; once wet, sugar can clump unevenly and the container needs cleaning and thorough drying before reuse.
Do not assume every hard clump needs to be thrown away, but do use common-sense food checks. A dry, clean, hard lump can generally be loosened or softened. Sugar with visible mold, pests, foreign material, or a questionable odor should be discarded. When in doubt about contamination, do not taste it to decide.
A low-effort routine that works
When you open a new bag, decide whether you will keep it in the original package or transfer it. If the package has a reliable resealable closure, squeeze out excess air and seal it; if not, fold and clip it, then put it inside a canister. For a canister, verify that the rim is clean and dry before filling. Add a food-safe saver only if you want the extra moisture buffer.
After measuring, wipe any sugar from the sealing surface and close the lid fully. If the canister has a gasket, check that it is seated rather than twisted or covered with grains. Store the container in a dry cupboard away from steam and splashes. This takes seconds and prevents the most common failure: leaving brown sugar loosely covered between baking sessions.
If the sugar starts getting firm, first check the closure. A saver may need refreshing, or the lid may not be sealing. Soften what you have, clean the rim, and correct the storage step that allowed moisture to escape. That small troubleshooting loop is more useful than cycling through several add-ins without fixing the seal.
If you buy a larger bag than you can use quickly, divide it into two clean, dry airtight containers instead of repeatedly opening one oversized package. Keep the reserve container sealed and use the working container for daily scoops. This reduces how often the whole supply is exposed to room air. Labeling the container with the purchase or opening date is optional, but it can help you notice whether the sugar is firming unusually quickly and whether your seal or storage location needs attention. When measuring, loosen any compacted sugar gently and return unused sugar promptly rather than leaving the canister open while you prepare the rest of a recipe.
How to choose a sugar saver without overbuying
A saver is a small accessory, so the decision should stay simple. First check that the product is intended for contact with food and that its care directions are clear. A porous disk needs occasional soaking and drying; if you do not want that maintenance, focus on a better canister seal instead. A saver that is too large can take up useful room or make the container awkward to close, while a very small one may not suit a large volume of sugar. Follow the capacity guidance on the package rather than assuming one size fits every household.
Look at the shape as well as the material. A flat disk is easy to lift out before measuring; a novelty shape may be harder to clean around. If you use a narrow-mouth jar, confirm the saver can pass through the opening. Check whether it comes with a placement holder or explicit instructions about direct contact. Do not choose on appearance alone: the useful features are food-contact suitability, clear maintenance instructions, and a size that fits the container you already use.
A bundled canister-and-saver set can be convenient when you need both pieces, but it may duplicate storage you already own. If your existing container seals well, a standalone saver is the lower-commitment test. If the lid leaks or is inconvenient, replace the container first; an accessory cannot correct a poor closure. In either case, judge results by texture over several ordinary uses, not by a single day. Your opening frequency and local conditions will shape how much benefit you notice.
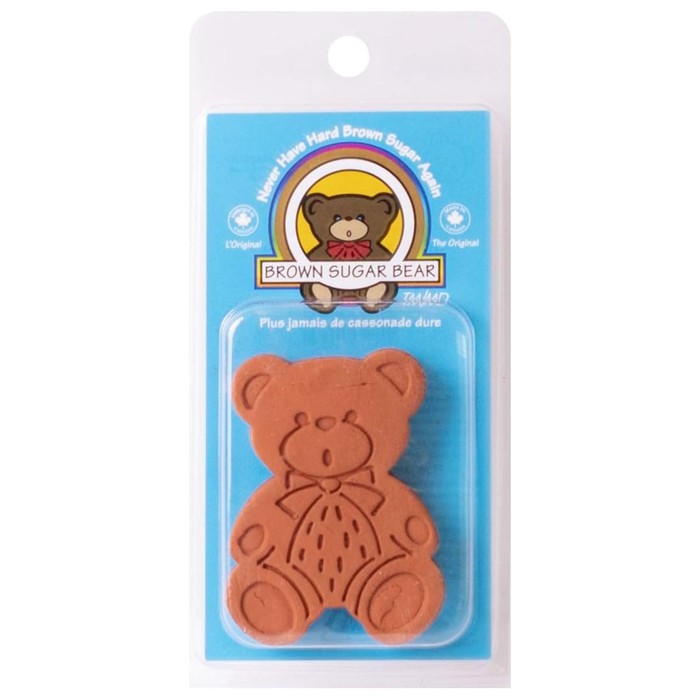
Brown Sugar Bear terracotta sugar saver
A small terracotta saver that is soaked briefly and then packed with the sugar. It suits frequent bakers who have had repeated hardening despite careful closure. Follow the instructions supplied with the specific saver, and check its food-contact suitability and care directions.
- Role: Amazon consumer option
- Terracotta saver, soak before use
- For frequent bakers
- Check food-contact suitability
- MOQ: Check current listing
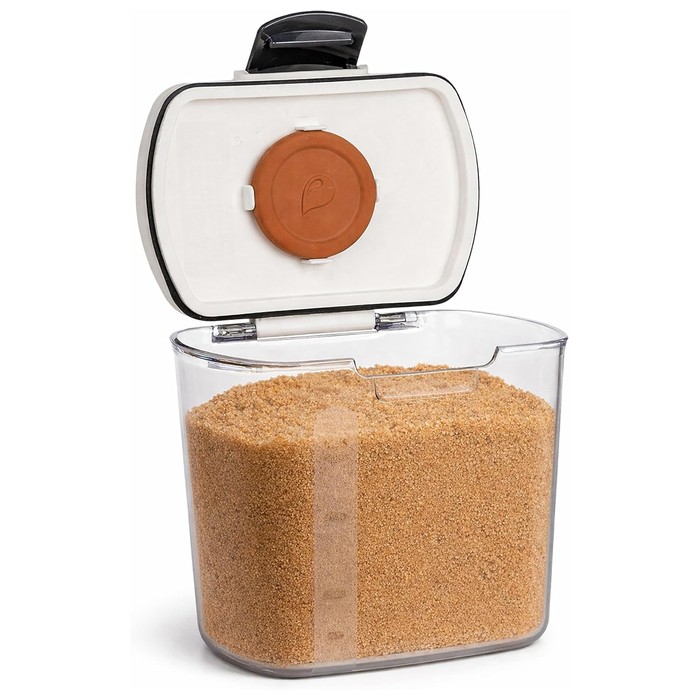
Progressive ProKeeper 1.5-quart brown sugar container
An airtight container route rather than a saver. Replace the container first when the current lid leaks or is awkward to close, because an accessory cannot correct a poor seal. Check that the capacity suits how much sugar you actually use before buying.
- Role: Amazon consumer option
- Airtight 1.5-quart container
- Fix the seal before adding a saver
- Check capacity against your usage
- MOQ: Check current listing
Questions readers ask
Does brown sugar need refrigeration? No. A dry pantry cupboard is more convenient for a sealed household supply. Refrigeration does not solve a poor closure, and condensation can complicate handling when a cold container is opened in a warmer room. Keep it sealed and away from heat, moisture, and direct sunlight.
Should a sugar saver touch the sugar? Follow the product instructions. Many savers are designed to sit directly in the sugar, but they should be clean, food-safe, and surface-dry after soaking. If a maker provides a holder or placement guidance, use it.
Will an airtight container keep sugar soft forever? No storage arrangement is perfect, especially if the container is opened frequently. A sound seal greatly reduces moisture loss, but old packaging, crumbs on the rim, and incomplete closure can still matter. Check texture occasionally rather than assuming the lid has sealed correctly.
Can I use one saver for more than one food? Only if its maker says it is suitable, and clean and dry it between uses as instructed. A saver that has been used with another food may carry odors or residues. For the simplest routine, dedicate it to brown sugar.
The practical takeaway
To keep brown sugar soft, prioritize a reliable seal and a dry, clean storage spot. Keep the bag clipped inside a container or use a canister that closes securely. Add a food-safe terracotta saver when frequent opening or a dry kitchen makes extra moisture support useful. For hardened sugar, use a brief microwave treatment for speed or a temporary bread method for a gentler recovery, then remove the add-in and reseal the sugar. That sequence solves both parts of the problem: restoring the texture today and slowing the next round of drying.
References
Hook this up to your favourite commenting platform — Giscus, Disqus, or your own.
Continue reading
Do Washing Machine Anti-Vibration Pads Stop Walking?
A pad that has shifted out from under the washer is a symptom, not the diagnosis. Check the machine is stable and the foot fits the cup before buying a grippier set.
When a Silicone Faucet Mat Pools Water, Check the Fit and Drain Path
A mat that holds a puddle is failing at one of three points: the counter does not drain toward the bowl, the mat is set the wrong way, or its outlet is blocked.
How to Keep a Cutting Board From Sliding on a Countertop
Most boards move because of a film of water or oil, a warped corner, or an overhang, not because the board is light. Find the cause, then pick a damp cloth or a grip pad.