How to Remove Hair from a Vacuum Brush Roll Without Damaging It
A careful, model-first method for clearing wrapped hair, checking the ends, and knowing when to stop.
 Lena Schmidt
Disclosure: We may earn a commission if you purchase through links on this page, at no additional cost to you.
A careful, model-first method for clearing wrapped hair, checking the ends, and knowing when to stop.
Hair around a vacuum brush roll is easiest to remove before it forms a tight band around the shaft or end caps. Start by switching the vacuum off and disconnecting its power source exactly as the manual directs. If the brush roll is designed to come out, remove it using the model’s release or fastener system; if it is not, clean it in place without forcing the housing open. Lift loose strands first, then cut only dense wraps along a molded cleaning groove when the manufacturer permits cutting. Keep the tool away from bristles, rubber fins, belts, seals, and wiring. Clear the end caps and roller cavity, reinstall every cover, and test only after the assembly is secure. A seam ripper or purpose-built hair tool can help, but neither overrides the vacuum maker’s instructions.
Why hair builds up on a brush roll
A powered brush roll rotates against carpet or flooring to move debris toward the suction path. Long hair, thread, carpet fibers, and pet fur can catch around the roll and tighten with repeated rotations. The visible wrap is not always the whole problem: strands may travel toward an end cap, axle, bearing area, belt, or side brush. A roll can look mostly clean from above while a knot at one end prevents it from turning freely. The exact route depends on the brush-head design, so treat the roller, its end supports, and the surrounding housing as separate inspection points.
The symptom can point to more than hair
A brush that stops, slows, or leaves debris behind may be tangled, but hair is not the only possible cause. A jammed object, worn belt, damaged bearing, blocked intake, depleted battery, or protection feature can produce similar symptoms. Do not keep restarting a head that is visibly bound or making an unusual sound. Remove the obstruction only through the maintenance steps allowed for that model. If the roller is clean and still will not turn or the warning indicator remains on, move to the troubleshooting section below instead of cutting deeper.
Make the vacuum safe before you reach underneath
A roller that starts unexpectedly can catch a finger, hair, clothing, or a tool. Power it down before inspection. For a corded vacuum, unplug it from the wall; for a battery model, remove the battery if the maker instructs you to do so. A robot vacuum should be switched off and taken off its charging dock before its brush is handled. Do not rely on a trigger lock, dock state, or screen being dark as proof that the brush cannot move. Keep children and pets away while the head is open.
Use the manual to decide whether the roller comes out
Look up the exact model number, not just the brand. Different vacuums from the same manufacturer can use a quarter-turn lock, a release tab, screws, an end cap, or a non-removable roller. Follow the illustrated sequence for the floor head you own. If the manual says to remove a cover, use the specified tool and fasteners. If no user-serviceable removal procedure is given, do not pry at seams or twist an end cap with pliers. A broken retaining tab can leave the brush loose or misaligned after cleaning.
If the roller cannot be removed, work from the angle shown in the manual and keep the tool in view. Pulling hair through a narrow opening can hide the blade tip, so loosen only what you can see. Do not rotate the roller with a tool in the head. If access is poor, stop and find the model’s support instructions rather than widening the opening or removing extra screws. That is the point where a different access method or service procedure matters more than a sharper tool.
Know what kind of brush roll you have
Before choosing a tool, look at the contact surface and drive system. A traditional bristle roll has brush rows and may have a long molded groove intended to guide hair cutting. A rubber-fin or combed anti-tangle roll may have no safe cutting channel; pulling strands from the fins can be better than passing a blade through them. A soft roller uses a fabric-like or delicate surface and should not be treated like a stiff bristle bar. Some heads have two rollers, a removable side brush, a belt, or a self-cleaning mechanism. Photograph the layout before disassembly if the manual permits removal and the parts are easy to mix up.
Choose a tool that matches the wrap
Start with any cleaning tool supplied with the vacuum. Its shape may be designed for the exact head and can include a comb, groove, or guarded cutter. For a loose surface layer, fingers or a soft brush may lift strands without cutting. For a dense wrap on a conventional bristle roll with a manufacturer-approved groove, small scissors or a seam ripper can release hair in controlled sections. A purpose-built brush-roll rake can help lift and separate tangles, especially where fingers cannot reach. Its teeth still need careful control: a hooked metal tool can scratch plastic or catch a belt if pushed blindly.
What to avoid
Do not use a box cutter, razor, kitchen knife, or large shears around an installed powered head. Do not saw across bristles, slice rubber fins, or drive a pointed tool toward a wire, belt, seal, or roller surface. Do not yank a long strand from a bearing or axle; it can tighten the knot or pull against a delicate retainer. Avoid water, oil, lubricant, and household cleaner unless the manual specifically allows them on that part. A washable brush roll is not the same as a washable motorized floor head. Keep liquid away from electrical contacts, bearings, and sealed components.
A step-by-step removal method
Work over a bin or sheet of paper so the cut hair does not spread. If the roller comes out, place it on a stable surface with the drive end visible. Remove loose hair by hand first. Rotate the roller by hand only when it is fully disconnected and the manufacturer’s procedure allows it. Check for a molded groove; if there is one and the manual permits cutting, make shallow cuts along that path, away from the bristles or fins. Cut just enough to release the wrap rather than digging to the shaft. Pull the loosened sections off in short lengths. If the tool meets resistance or the surface starts to fray, stop and reassess.
Clear both ends, not just the middle
Inspect each end cap and the area where the roller meets its support. Remove visible hair and thread without prying at a sealed bearing or pulling on a wire. Check the cavity beneath the brush, the belt path if the model has one, and any side brush that the manual identifies as removable. Use a dry cloth or soft brush for dust. If the manual shows a removable end cap, clean it only as described and return it to the correct side. Do not swap left and right components; some rollers have a drive fitting that only seats one way.
Reassemble and test without skipping checks
Before closing the head, compare the roller, end caps, belt, and cover with your pre-cleaning photo or the manual diagram. Seat the roller fully and lock each latch or screw as specified. A cover that looks closed but is not latched can rub the brush or come loose during use. Reinstall the head and battery only after tools and loose hair are clear. Run the vacuum briefly on a safe surface, listening for scraping, clicking, or a repeated stall. Stop immediately if the sound changes or the brush does not spin normally. A short test can confirm assembly; it is not proof that a damaged belt or bearing is healthy.
If the brush still does not turn
With power disconnected again, check for a second wrap at the far end, a small object wedged in the head, or hair trapped under a cover. If the roller moves by hand but stops under power, the issue may involve a belt, motor, sensor, or electrical connection. If it will not move by hand after visible debris is removed, do not force it. A damaged end cap or bearing can bind even when the bristles look clean. Use the model’s error-code guide, warranty support, or an authorized repair route. Replace the brush roll only when the manufacturer identifies it as a serviceable part and the replacement matches the exact model or part number.
Robot vacuums and self-cleaning heads need their own procedure
Robot vacuums often have removable rollers with end caps that collect hair. Remove the robot from its dock, switch it off, and follow the model-specific latch steps. Keep track of the roller’s orientation and each end cap. Some rollers are rubber, some are bristled, and some combine materials; a cutting tool that works on one may damage another. If the dock or vacuum has an automatic hair-cutting or self-clean cycle, use it only under the stated conditions. Do not run a self-cleaning cycle with fingers or a loose tool near the brush.
How often should you inspect it?
There is no single calendar interval that fits every home, floor type, brush design, and amount of hair. Check sooner if someone in the home has long hair, pets shed heavily, or the vacuum repeatedly picks up string and fibers. An inspection after a few cleaning sessions is a practical starting habit; shorten or lengthen it based on what you find. Clear small loose strands before they wind around an end cap. If your manual gives a maintenance interval, use that instead of a generic online schedule. Make inspection part of emptying or cleaning the vacuum only when the machine is fully powered down.
When a dedicated brush-cleaning tool is worth considering
A dedicated hair tool makes sense when the roller tangles often and your fingers cannot reach under the wrapped strands. It is less compelling if the vacuum includes an effective comb tool or if hair rarely collects on the roll. The Pikk-it Vacuum & Hair Brush Cleaner is one purpose-built option marketed for tangled hair and fibers on rollers and hairbrushes. Its Amazon US listing showed 4.3 out of 5 stars from 2,606 ratings when checked for this guide. That is useful review depth, not a guarantee of fit for every brush material. Confirm that the current listing, tool shape, and instructions suit your roller before buying. The dedicated tool should loosen and lift the tangle; it should not be forced between fins or used to pry open the head.
A simple routine that prevents repeat damage
After each use, notice whether the vacuum leaves a trail of hair or the roller sounds different. When cleaning is due, isolate power, use the manual’s opening method, remove the roller only if it is designed to come out, and clear the middle and both ends. Keep a small tool with the vacuum if it solves a real recurring problem, but store any exposed cutting edge safely. Close the head, confirm the latch, and test briefly. This takes less effort than letting a tight wrap build up, and it keeps a small maintenance task from turning into a damaged brush or a confusing repair.
Quick answers
Can I use scissors to remove hair from a vacuum roller?
Only if the manufacturer’s instructions permit it and the brush has a safe path for cutting. Use small, controlled cuts along a molded groove when present. Keep the blades away from bristles, fins, belts, wiring, and the roller surface. If the groove or removal procedure is unclear, do not cut.
Is a seam ripper safe for a brush roll?
It can be useful on a conventional brush with a suitable groove, but its pointed tip can scratch plastic or catch delicate parts. Use light pressure and stop if it snags. It is not automatically suitable for rubber-fin or soft rollers.
Should I wash the roller after removing hair?
Only if the manual identifies that roller as washable and explains how to dry it. A removable brush roll does not mean the entire motorized head can be rinsed. Keep liquid away from bearings, motors, wiring, and contacts.
What if hair keeps wrapping around the brush?
Frequent tangles may reflect long hair, shedding, flooring debris, or the brush design. Check the roller and end caps regularly and clear loose hair early. If the vacuum offers a compatible anti-tangle brush or self-cleaning feature, confirm the exact model fit before replacing parts.
A purpose-built tool to compare
The Pikk-it is a compact rake-style option for people who regularly remove wrapped hair from vacuum rollers. Its Amazon listing shows 4.3 out of 5 from 2,606 ratings. Ratings summarise buyer feedback and change over time; they do not establish compatibility with a particular brush. Check the current seller, item and tool edge before ordering.
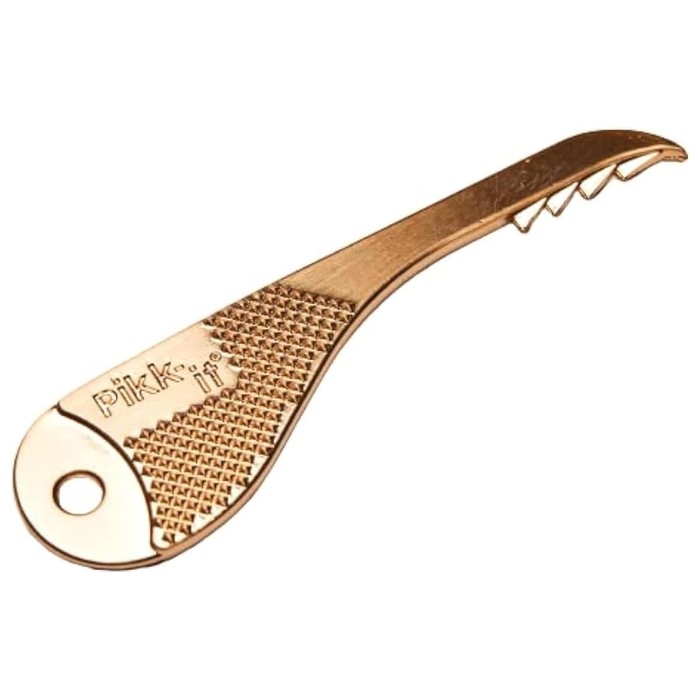
Pikk-it vacuum and hair brush cleaner tool
A compact metal tool with a serrated comb edge and a curved hook, intended for lifting hair and fibres out of brush surfaces. The edge is shaped to get under a wrap instead of cutting through it, which makes it a gentler first tool than a blade when the manual allows prying. Keep it clear of belts, seals and wiring.
- Role: Amazon consumer option
- Serrated comb edge
- For wrapped hair and fibres
- Keep clear of belts and seals
- MOQ: Check current listing
If you already own a seam ripper or the vacuum’s supplied cleaning tool, try the approved method before adding another gadget. Do not buy a tool simply because the vacuum has collected hair once.
This guide relies on model-specific manufacturer maintenance instructions for disassembly, power isolation and brush-roll care. Vacuums differ by model, so the manual for your exact machine overrides any general step described here.
Hook this up to your favourite commenting platform — Giscus, Disqus, or your own.
Continue reading

Do Washing Machine Anti-Vibration Pads Stop Walking?
A pad that has shifted out from under the washer is a symptom, not the diagnosis. Check the machine is stable and the foot fits the cup before buying a grippier set.

When a Silicone Faucet Mat Pools Water, Check the Fit and Drain Path
A mat that holds a puddle is failing at one of three points: the counter does not drain toward the bowl, the mat is set the wrong way, or its outlet is blocked.
How to Keep a Cutting Board From Sliding on a Countertop
Most boards move because of a film of water or oil, a warped corner, or an overhang, not because the board is light. Find the cause, then pick a damp cloth or a grip pad.